Search This Blog

Thursday, June 27, 2013

Knitted Bunnies!

My Little Rabbit <3


 So here's the little knitted Rabbit I promised you all!
Isn't it just so freaking adorable? I absolutely love it to death and it even comes with some clothes! So as promised here's the pattern for it. I'm not sure whose patter it was originally (and I'm really sorry that I cant give credit where credit is due!) but I found this pattern on Pinterest, I clicked on the picture of the little teddy bear (yes there is a bear as well!) and it downloaded a .pdf file to my phone.... So I'm going to write it down for everyone (exactly as stated in the pattern I downloaded) And if you stumble across it somehow and it's your pattern please let me know!!

Head: Side A
cast on 12 sts. (start with a K row)
1. Inc 1 st st at each end of row. (14 sts)
2. P across
3. Inc 1 st st at beginning of row. (15 sts)
4. P across
5-10. Repeat rows 3 and 4 three times more. (18 sts)
11. Cast off 8 sts at beginning of row K to end. (10 sts)
Place marker at end of last cast off st.
12. P across
13. K across
14-15. Dec 1 st at each end (6 sts)
Cast off *P2tog at each end as u cast off

Side B
Cast on 12 sts (start with a P row)
1. Inc 1 at each end of row (14 sts)
2. K across
3. Inc 1 at beginning of row (15 sts)
4. K across
5-10. Repeat rows 3 and 4 three times more (18 sts)
11. Cast off 8 sts at beginning of row K to end (10 sts)
Place marker at last cast off st.
12. K across
13. P across
14-15. Dec 1 st at each end (6 sts)
Cast off  *K2tog at each end of row as u cast off

Head Gusset (Start at back of neck)
Cast on 3 sts.
1. p across
2. inc 1 st on each end (5 sts)
3-5. work in st st begin and end with a p row
6-9 repeat rows 2 through 5 one more time (7 sts)
10. inc 1 st at each end (9 sts)
11-23. work in st st begin and end with a p row
24-25 Dec 1 st each end (5 sts)
place marker at each end of this row
26-32. work in st st begin and end with a k row
Cast off *p2tog at each end of row as you cast off

To make up head:
Sew side pieces from tip of nose to chin. Insert head gusset matching markers (this is where the eye positions are) sew gusset in place.Gather neck edge adding extra stuffing if needed and secure. Make the indents and add the eyes. Then make the nose and mouth.

Ears for Rabbit:
work piece in garter stitch (make 2)
Cast on 5 sts
1. k across
2. k1 inc 1 in each following st to end (9 sts)
3. k across
4. k3 inc 1 in next st, k1, inc 1 in next st, k3 (11 sts)
5-17. k across
18. k4, k2tog, k5 (10 sts)
19-21 k across
22. k4, k2tog, k4 (9 sts)
23-30. k across
31. k2tog at each end of row (7 sts)
32. k across
33-36 repeat rows 31 and 32 two more times (3 sts)
37. k last 3 st together.
tie off. Fold cast on edge in half and stitch together

Ears for Bear:
work piece in garter stitch (make 2)
Cast on 8 sts leaving a long tail to sew to head
1-4. k across
5. Dec 1 st at each end of row (6 sts)
6. k across
Cast off

Body:
Cast on 15 sts (begin at neck edge)
1. k1, inc 1 in each following st to end (29 sts)
2-6. work in st st begin and end with a p row
7. {K6, inc 1} twice, k1, {inc 1, K6} twice (33 sts)
8-10 work in st st begin and end with a p row
11. k15, inc 1, k1, inc 1, k15 (35 sts)
12-16. work in st st begin and end with a p row
17. k15, skpo, k1, k2tog, k15 (33 sts)
18-20 work in st st begin and end with a p row
21. k14, skpo, k1, k2tog, k14 (31 sts)
22-24. work in st st begin and end with a p row
25. k1, {k2tog} to end (16sts)
26. p across
Cast off remaining 16 sts
Fold sides of body together, then sew cast off edge, gather neck by weaving yarn around neck edge then pull closed and secure. Sew back edge leaving an opening, stuff then close opening.

Legs: (make 2)
Cast on 12 sts
1. k1 inc 1 in each following st to end (23 sts)
2. p across
3. k1, inc 1, k7, inc 1 in next 6 sts, k6, inc 1, k1 (31 sts)
4-6. work in st st beginning and ending with p row
7. k13, k2tog, k1, skpo, k13 (29 sts)
8. p across
9. k12, k2tog, k1, skpo, k12 (27 sts)
10. p across
11. k7, cast off next 13 sts, k to end (14 sts)
12. p across
13. inc 1 at each end of row (16 sts)
14-20 work in st st begin and end with p row
21. {k1, skpo, k3, k2tog} twice (12 sts)
22. p across
23. {k1, skpo, k1, k2tog} twice (8 sts)
Cast off *{p2tog to end casting off as u go}
Sew instep, sole, back of leg and top seam, leave an opening to stuff, then close after stuffing.

Arms: (make 2)
cast on 6 sts
1. k1, inc1 in each following st to end (11 sts)
2. p across
3. k1, {inc 1, k2, inc 1, k1} twice (15 sts)
4-14. work in st st begin and end with a p row
15. k1, skpo, k9, k2tog, k1 (13 sts)
16-24. work in st st begin and end with p row
25. k1, {skpo, k1, k2togmk1} twice (9sts)
26. p across
cast off *k1, {k2tog} to end casting off as you go. Sew arm seam leaving an opening to stuff and then close.

To make up:
Sew head in position. It is a good idea to experiment with the ears before you sew them on. Attach arms and legs in the desired places.

The instructions for the clothing will come a little bit later =) but for now enjoy making some awesome bears and bunnies!

Monday, June 24, 2013

2.1k VIEWS!!!!!

Yup, that's right folks... We have finally hit the 2,000 view mark! I couldn't be happier!

So in honor of this special event, I've decided to do a blog on origami butterflies.

I'm making a whole bunch of little ones, so I took some step by step shots using my awesome new phone, who's camera is 100 times better than my old one, so get ready for some extra crisp views!

Step one: you start out with a square of paper. (The ones in the picture were made by folding an A4 sheet of paper in half and making a large triangle first, then the scrap of paper left over is what I have used to make the triangles used in this blog.) You can make 2 triangles from each scrap of paper. Now I say triangles but you really end up with a square that is folded in half diagonally.


 Step two: take the top corner and fold it down lining the edges of the paper up. You should be able to make two if these triangle shapes from the scrap of paper, but it will depend on how many you personally wish to make, and what size paper you are using.


Step three: while the shape is still folded in half diagonally cut off the excess paper from the bottom of the scrap, make sure all the edges line up and there is no excess paper on any of the sides, or your butterfly may end up with some overlap in its wings.


Step four: now that you have the square piece of paper, you need to make the pre-folds. Fold the piece diagonally both ways so there will be an X shape of folds. Once you have done this fold the paper in half so you will have a straight line going through the middle of the X folds.


 Step five: collapse the folds in on themselves. You will end up with another triangle shape with two flaps on the inside, which you will be able to see from the open end of the triangle.


Step six: now its time to start forming the butterfly, we will start with the bottom wings. Turn the open end of the triangle away from you.


Step seven: take on of the corners from the open end and fold it down to meet the top point of the triangle. Make sure not to grab both corners, or the butterfly's top wings will have creases in them.


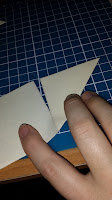
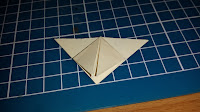
Step eight: do the same to the other corner. You should end up with something similar to the picture on the left, with what looks like a small square in the middle of a triangle. These two folded down flaps will be the butterfly's bottom wings!


Step nine: flip the whole thing over, so now the two corners you folded down are on the bottom and the plain triangle shape is facing the top.


Step ten: take the pointy end of the triangle and fold it upwards towards the open end. Make sure and fold it so the point is higher than the open edge. Doing this will pull up the other edges as well but this is ok, we want this to happen.


Step eleven: after you have folded the point to the top you need to flatten the shape. The bottom edges will have pulled up so you need to pull them back down and flatten them, it will make a small overlap of paper on the flap you pulled up in the previous step and look similar to the picture on the left. We're almost done!


Step twelve: once again flip the whole thing over, It should be starting to look like a butterfly now, and you should have a small triangle peeking out over the open edge of the top wings.


Step thirteen: fold this small triangle back over the open edge of the wings. this will keep the whole thing closed together without having to use staples or glue.


Step fourteen: fold the whole shape in half, along the line between the bottom wing flaps. Make sure the small triangle doesn't come unfolded during this because the butterfly will sort of fall apart.


Step fifteen: pinch the top where the triangle was folded over, with your fingers, and flatten. This will give you a butterfly body ans well as pull the wings away from each other slightly giving the whole thing a more butterfly feel.


Flip the whole thing over and you should have something that looks similar to the little butterfly pictured above!
Now you can decorate it however you like, add some antenna, draw on some spots.... make some different shapes and sizes and colors.... the possibilities are endless!

Next blog:
Instructions on how to make this adorable little bunny using a pattern that I found for free on pinterest!


Thursday, June 13, 2013

The Teddies!

First of all, let me state that there has been a problem... I am not sure if it has to do with the loss of my laptop or what has happened, but all of my blog photos and videos have seemed to disappear...

I was able to replace 98% of the blog photos, luckily because I have them all saved to my pc (which Lewy fixed for me) but the videos are pretty much gone... they were all done using the webcam attached to the laptop and not saved anywhere but here *sad face*

One of the ones affected was the blog about the little teddy bears I made, so I decided to do a proper blog about them... I did leave the other post up because it has the link to the ravelry website so you all can get the pattern... but here is is one more time.

The pattern is pretty straight forward, all knitted on straight needles and sewn together, it's overall a very cute little teddy bear and they are pretty addictive to make.
These pictures are just a few that I made, the brown one on the right went to little Bella, and a twin one went to Daniella for her first Easter, the black one with the white face goes to my mom, the stripy one went to my cousin Ashley's little boy Dylan, and the two little ones are what I like to call my Mr & Mrs bears. They take about 3 days for me to make, the larger ones take the least amount of time, but because my fingers tend to cramp up a bit when knitting for long periods of time I have to put it down and rest a little before starting up again, if you are able to do the whole amount in one sitting it should only take you a day or two at the most to finish one off. I thought it would be pretty fun to play around with them a little bit, hence the stripes and the accessories. The brown bears both had sewn on felt eyes, but you can use fabric paint (like I have done for the rest of them) or even buttons, but I wouldn't suggest that if you plan on giving the finished product to a small child.

 Now the only thing I do differently from the pattern is that I don't stitch closed the neck, I attach the head and the body together using the cast on edges as a guide, I find it makes the whole thing a little bit stronger which is good if you want to have little kiddies dragging it around. The Mr & Mrs Bears were by far my favorite to do, because they have accessories!
 The Mr bear is sporting a nifty little felt top hat, a stunning little mustache, a powder blue tie to match Mrs bear, and not pictured is his little Ball and chain... While Mrs bear is sporting a lovely white veil with a jeweled tiara in blue and silver, as well as a nice little bouquet of silver roses! The had their eyes put on using fabric paint, Mrs bear had a nice little pre-wedding nose job because I made the mistake of painting on some horrid red lips that made her look like a clown, but luckily enough I had enough yarn left over to make her a new nose.


Wednesday, June 12, 2013

The Little Envy Doll!

That's right we have a doll!!!! Look at her there in all her glory, hand made by my using a pattern I made entirely by myself all HAND SEWN including her hair.

Yes I have a pattern for her, but no I cannot upload it. Not because I dont want to, but because I do not have a working scanner at the moment, and it was not previously scanned to my computer (sad face) it is sitting here in front of me in an envelope however...

This little girly I have decided to keep for my own daughter whenever she decides to grace us with her presence. But I have made two others, one is a blank state sitting in the bottom of my craft drawers just waiting for a face and some hair and clothes, the other was made into a ninja baby. This is a long story and no I wont go into it, but this one ended up going to one of my very bestest friends ever.
 They all start out blank, bald heads, no eyes. The face is just a sort of round ball with ears attached and a small bead or button sewn in the front for the nose. I do that bit before I start to stuff them. The head and body are all attached and stuffed, the arms and legs are attached separately using buttons so they move up and down like real arms and legs.
After everything is attached and secured I can start to add the details, like ankles and elbows, even a belly button. Because they are all babies (and I really suck at making mouths) I cut the tip off some old dummies or "passifiers"  and used some super glue to attach them to where the mouth would be, just under the nose. Next I drew a line with a pen for where the hair should go, and using a hair colored yarn, I doubled the length I wanted the hair to be, and started to sew around the line, by folding the yarn in half and stitching through the fold to attach the strand to the head. This takes a lot of time though and I don't recommend that you try and do it if you have no patience. I tied the hair up into either pony tails or pig tails just so I didnt have to do as much sewing. Next we put the eyes on the face, you can do any type of eyes you want, felt eyes, glass eyes, googly eyes, or even paint them on! You can make some doll clothes to fit if you like or buy some, or even use some old baby doll clothes.

The Mario Mushrooms Paradox

So this is the first of quite a few new blogs to come. See I was going through all my old pictures and found a whoooooole bunch of stuff I havent made blogs for yet... So I figured now would be a better time than any to create some new blogs, maybe get some new viewers in, and pretty much just show off my awesome talents....

Now when it comes to Super Mario, I'm a big Luigi fan. I dont think he gets enough credit... he does just as much work as Mario it's not his fault he usually only gets to come around and be "Player 2"...

But saying that aside, we're here to talk about the mushrooms! I made 4 of them, the mini,extra life, growth, and giant ones. They're really simple and easy to make, you dont even need a pattern for them!

Here's all you need: material/felt in respective colors, cream colored felt, white/orange felt for spots, and some black paint or a black fabric marker, a needle, some thread, and some stuffing. How much of each one you need will depend entirely on the size of the mushroom you are making, though (hence why I cant really give you a pattern)
Now to the right here is a picture of the mushrooms from the game. The four that I have made, Giant, Growth, Extra Life, and Mini. I can give you step by step instructions:
1. Grab something round like a bowl or a pot or a hoop and trace around it on your material or felt.
2. Cut it out, cut a smaller circle of the same color material or felt, this will be to cover the bottom after you stuff it.
3. Stitch around the edge of the big circle, when you have made it all the way around pull it tightly so it makes a sort of ball.
4. Stuff it as much as you want but be careful not to break your thread or  you will have to start over again.
5. After you have stuffed it as much as you want pull the thread tight and tie it off.
6. Using the smaller circle of the same color material or felt cover the gathered edges and stitch closed. This will give you a pretty finish.
7. Cut a circle from the cream material/felt and cut a strip long enough to go all the way around it.
8. Sew the ends of the strip together so you have a sort of tube.
9. Sew the tube to the circle so you have what looks like a cup, and flip it inside out so the seams dont show.
10. Attach the cup to the mushroom top by sewing the cup to the circle you stitched on earlier on the mushroom top to cover the gathered edges. Sew halfway around and then stuff before continuing to sew around.
11. Cut out some white/orange spots that would be proportionate to the size of the mushroom you are making and stitch them around the sides of the mushroom top. (You will probably need 5-6 of them)
12. Using the paint or fabric marker draw on two lines for the eyes on the cream colored material/felt.

Viola, you have your very own Super Mario Mushrooms. 

Lots of Loving,
*Rah~Rah*
 

Finally!!!


Yup, thats right! Rah Rah is back in business!! I'm very sorry it has taken me so long to get back into writing, but over the past month both my laptop and pc have died, and both me and Lewy have been sick as doggies...

But now I'm better, and while I havent gotten a replacement laptop just yet I HAVE gotten a new hard drive for my pc.... and believe it or not but when Lewy tried to put it in the old one just magically started working again. So I didnt lose any of my stuff!
So now I have all my pictures, wedding stuff, and my knitting patterns backed up on usbs and kindles XD


Now since my last post promised instructions on knitting a beanie, I will hold true to my promise.


Body of the Hat:
Cast on 84
k 8 rows in rib knit (k2, p2) * Repeat to end
Optional: Attach a different color to being new stripe
k27 rows in St. st.
Optional: Attach another color for final stripe
k13 rows in St. st, ending with a purled row
Note: If you want your hat to be longer or shorter, you can add or subtract rows here before you begin decreasing.
Decrease:
(k10, k2tog)* Repeat 7 times to end
Next Purl
(k9, k2tog)*
Purl
(k8, k2tog)*
Purl
(k7, k2tog)*
Purl
(k6, k2tog)*
Purl
(k5, k2tog)*
Purl
(k4, k2tog)*
Purl
(k3, k2tog)*
Purl
(k2, k2tog)*
Purl
(k1, k2tog)*
Purl
(k2tog)*
Finishing:
   Cut the yarn, leaving a long tail, and pull through remaining stiches, securing in first loop. Use the remaining tail to join the sides together. If you used multiple colors, use the tails from the color change to join that color's section together. Weave in any remaining ends.


Now just a side note that this beanie is made using straight needles. (I have a project in the works using circular needles but I need to finish it)

Because I have to work today, that means this blog will be sort of short and to the point. Tomorrow, however, I am off, and my only housework involves doing laundry in my brand new washing machine, and making my bed....

We have some interesting things to cover, some new patterns to put up, and lots of projects to finish so stay tuned! Also I'm sorry for the gifs, but I am super excited to be able to write on something with a real keyboard again!

Lots of Love,
*Rah~Rah*