Search This Blog

Wednesday, August 17, 2011

The First bag...

So here we go! Now I got the pattern for these bags at This Site, and in the instructions it says to knit it "in the round"... now since I'm only a beginner I dont really know how to do that so I have cheated a little bit and decided that I am going to knit two different sections and sew them together.

This is a quite difficult thing to do (unless you're an expert knitter), I had to start over about 4 times which is why it has taken me so long to put up a blog about it! I am VERY happy with the end result even though it took me a while and its not entirely finished, this part on its own could be used by its self, for a wall hanging or a patch on a jacket, maybe even sewn on to a pillow for a Harry Potter themed throw!
For this one I use some angora wool not sure what size it is, and size 11 knitting needles. There is more to this project though, I still have the other half of this bag to do and the other three houses as well! But now that I know what I'm doing it will be easy peasy! So hopefully this will get you all in the mood to try it out, and attempt it at least its a really fun project to do, especially on a rainy day like today was!

Next on the list: finish off the bags! Make more snitches, mice, and cats, and figure out a way to make some magic wands!

Wednesday, August 10, 2011

Let there be cake!

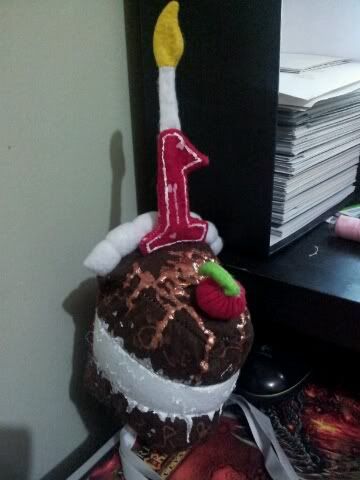
What could be more appetizing than a nice gooey slice of chocolate cake? Nothing thats right!
This little beauty was made from felt, hand stitched and fabric paint gooey-ness...

What to do? This one is so simple you dont even need a pattern, cut out two triangles thats the size of the slice you would like, brown for chocolate cake, white for vanilla, pink for strawberry.... or go all out and make a multicolored rainbow cake!
Next, cut a few strips for the layers of your cake long enough to go around the two large edges of your triangles, and then cut a few strips of the "cream" to go between the layers of cake. Sew these strips in a cake/cream pattern until you run out of cake layers.
Next cut an icing layer that is as wide as the short edge of your triangles, and as long as all of your layers once they have been sewn together, this will be the back of your cake icing.
Cut out a number, or numbers from your choice of colors, a strip of white, and a flame shape from some yellow, this will be your candle. The cherry is optional, but its just a red circle and a green strip of felt.
You will also need some ribbons so you can wear it as a hat, or if you just want it as a toy forget the ribbon.. Now for the interesting part: the assembly.
1. Take the ribbons, if you are using it, and sew one end of it to each long edge of the triangle you will put on the bottom of the cake.
2. Make the candle: Sew the flame together and turn it inside out, sew the white strip together and attach the flame to it this will be the candle wick, place the wick and flame inside the number and sew the number together leaving an opening at the bottom to flip it right side out, leave this open.
3. Cut a small opening in the top of the cake and place the open end of the candle into the opening. Sew this shut from the underside of the cake top. 
4. Take the layers and the top part of the cake, sew the layers around the two long edges of the triangle, this will make up your slice.
5. Take the back of the slice and sew across the top of the cake, and down each side of the layers, this will make up the icing.
6. Sew the bottom triangle on, the same way you did the top of the cake, but leave the back edge open so you can flip it right side out.
7. After flipping it right side out, make sure all your points are pointy and then stuff it with craft stuffing until you're hearts content. Then sew up the bottom back edge.
8. Add your details, this means using the fabric paint which will make your cream look a little more creamier, or look like chocolate/caramel sauce drizzled over the top.

To make the cherry, single stitch around the edge of the red circle and pull semi-tight. Add some stuffing and pull the thread tight, add the green strip of felt to the opening and sew shut, then tack it to the top of the cake.

And there you have it, your own personal slice of cake, now you really can have your cake and eat it to!

Tuesday, August 9, 2011

Nothing better than a birthday!

Alright So I know this has nothing to do with Harry Potter, but I still think its worth an honorable mention. Sunday I am attending a very special little girl's FIRST birthday ever, and I have decided that the whole "eat it or wear it" saying needs to be put into motion.
Since most little ones feel the need to grab handfuls of everything and shove it straight into their mouths (which we dont want her doing to the cake) I have decided to make something she can wear that will look almost as good!
We are talking about the exclusive CAKE HAT!!!! It's a big slice of chocolate cake, with a big dollop of vanilla ice cream melting and oozing down the sides, with a great big #1 candle on top. Mind you it will all be made of felt so she can chew on it 'till her little hearts content and no one will be upset that there is handfuls of real cake missing and smeared all over her face and clothes....
There will be a photo put up as soon as it's finished, and yes I am still on Hiatus from the Harry Potter themed objects until we get settled in and unpacked lolz, this is just being made from some bits and pieces I had laying around.

Sunday, August 7, 2011

Well... here we go!

Currently in the process of moving houses.... Everything has been packed up in boxes and the house looks really empty =( So for now all I have to keep me busy is the Hogwarts House Bags I'm knitting which hopefully I can finish soon.... after that though there will be no more updates for a little while since all of my stuff will be in storage until we can get our own place. That doesnt mean I wont be checking up to see how things are going mind you!

Friday, August 5, 2011

The Bag Lady...

So I have been working on some House Bags (<-- pattern found at that link) And I must say they are a lot harder than they look. Since I am only a beginner knitter I haven't really figured out how to "work in the round" just yet so I am just straight knitting them and sewing them together after I am finished.

I've started off with the Gryffindor House bag (The first pattern on the link above) and at the moment I am about 1/4 of the way finished with it, it really is a good thing this movie shindig is a few months away at least! I'm sure  I would have been further along with my knitting projects had I not spent so much of my time creating the house elf pattern and trying to perfect it, however since putting the pattern up on my deviant art page it has been added to a few groups which feature various patterns and I have been informed that a few people are actually going to attempt to make one themselves! I'm sure you must all know how good that feels to know that people are attempting to recreate something you have made for them,  I'm just appreciative that people have taken the time to look at it and the fact that they want to try and make it themselves is just the icing on the cake!
My friend Katie (who has admitted to me that she is a horrible sewer) has commissioned me to make her one of her very own, and I have been informed by a few people that I should create two of them and give them to her as a wedding present since she is the biggest Harry Potter Fan Girl that I know (besides myself when it comes to Tom Felton *drools*) I have considered doing this for her however, I'm not sure if I would actually be able to make two of them by the time her wedding comes around since I am still in the middle of searching for a job and having to drive back and forth to interviews all day long... Still it seems like an intriguing idea.

Any ways back to the bag! Yes the bag, I have been using size 4 needles, red and yellow Oki Angora Delux Yarn which is 70% Goat Hair and 30% PAC. and I have discovered that if you intend on using the double needle method as I have decided to do then you cannot just start the pattern from the beginning of each row as I thought, you need to work from the first to last stitch of one row and the last to first stitch of the next row in order to have the pattern turn out right, otherwise it will be very messy and all over the place, trust me I have had to restart it once already because I made this mistake!
That's all for the time being, just thought I would let you all know what I was working on at this particular moment in time, will update you all again once I have finished the first bag and I will be sure to include some photos!!!

Wednesday, August 3, 2011

The House Elf Correction (my bad!)

So after sewing and falling in love with my house elf plushie doll, I was having trouble figuring out what to make the eyes out of.... I foolishly told all of you to use polymer clay, this was a HUGE mistake! Dont listen to that information what you really needed to do was to make your eyes out of felt. I found a wonderful tutorial on how to make realistic felt eyes on deviant art, This tutorial will help you if you dont know how to make them yourself! I will admit I had no clue how to make them I tried the polymer clay method and it looked atrocious!

I suggest that from now on you just ignore anything I say regarding polymer clay usage unless I put up whole lessons on how I make things using it. For our own good lolz! I also had to make the mouth using felt, it doesnt look that great however, I couldnt find a tutorial on how to make a realistic mouth out of felt.

To top it off I used an old tea towel cut in half and tied at the ends for the clothes. I stitched it in place at the shoulders just to stop it from coming off, and cut another strip off the remaining bit of the tea towel to use as a belt. The good thing about this is that their clothes are supposed to look shabby so it's not that big of a deal for you to use random scraps you have laying around, whether they are a bit dirty or even if they have a hole or stain!
Hope you all have enjoyed this House elf experience! If you make one please let me know how it turns out, and remember you can make and sell as many as you like but please dont try and sell the pattern I made it free for a reason!

Monday, August 1, 2011

Finally Finished the House Elf

Well it's about time right? Yes I know you have all been waiting.... well at least I hope you have been. I have finally finished the pattern and sewn the doll together.


The pattern is available on my deviant art page, I had to scan it and it would not fit on a single page so it is in four parts. Part 1 Part 2  Part 3 Part 4 (sorry its a little scribbled just cut out the pieces around the black line) I hand sew the pieces together so if you do not plan on doing this I would give ample room around the pattern to allow for a machine seam.
The finished product (before the eyes and clothing have been added should look similar to the photo added!

I had to use about 8 sheets of flesh colored felt, where I traced the pattern pieces onto them to save as much space as possible. While the pattern is pretty much self explanatory I will still share a few helpful hints. When working with the hands and arms, the best course of action is to sew the hands and turn them right side out, then sew the arms and attach them to the wrists. The fingers are hard to turn, I suggest using a  pin to coax them up so you don't rip your seams or your felt, or you can try using a small long object that is rounded on the end such as a crochet hook because this will also not poke holes in your material. Leave an opening at the back of the body so you are able to stuff and turn out the rest of the body, stuff it so it is as hard or as soft as you wish and then sew up the back. 
After you have finished the body it's time for the little details such as the knees/toes/elbows. These are quite simple and as the pattern suggests where you should put them (the elbows and knees have been slightly enlarged to stand out (as they do on Dobby the House elf from Harry Potter), and as you can see from the image I have added where to put the toes. The arms will need to be attached separately, this is so they can move freely like a normal doll's arms would move, and this can be achieved by using flesh colored thread and a doll needle (the really long ones you can get from any craft shop)

As for the eyes, I have chosen to use polymer clay. White clay for the eyeball, brown for the iris, and black for the pupil then hot glued them to the face. Then you just take some light pink fabric paint and use it to paint on a mouth, or you can embroidery it if you are good at sewing, take some scrap material or a shabby pillow case and use it for a tunic, you can choose to make a belt if you wish!

And there you have it, a free pattern and instructions on how to make your very own house elf from harry potter! If you have any questions just leave it in the comments and I will try my best to answer it!

Still on the menu so to speak: more golden snitches and mice, as well as some house bags and magic wands!