So in honor of this special event, I've decided to do a blog on origami butterflies.
I'm making a whole bunch of little ones, so I took some step by step shots using my awesome new phone, who's camera is 100 times better than my old one, so get ready for some extra crisp views!
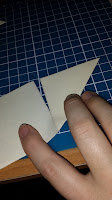
Step one: you start out with a square of paper. (The ones in the picture were made by folding an A4 sheet of paper in half and making a large triangle first, then the scrap of paper left over is what I have used to make the triangles used in this blog.) You can make 2 triangles from each scrap of paper. Now I say triangles but you really end up with a square that is folded in half diagonally.
Step two: take the top corner and fold it down lining the edges of the paper up. You should be able to make two if these triangle shapes from the scrap of paper, but it will depend on how many you personally wish to make, and what size paper you are using.
Step three: while the shape is still folded in half diagonally cut off the excess paper from the bottom of the scrap, make sure all the edges line up and there is no excess paper on any of the sides, or your butterfly may end up with some overlap in its wings.
Step four: now that you have the square piece of paper, you need to make the pre-folds. Fold the piece diagonally both ways so there will be an X shape of folds. Once you have done this fold the paper in half so you will have a straight line going through the middle of the X folds.
Step five: collapse the folds in on themselves. You will end up with another triangle shape with two flaps on the inside, which you will be able to see from the open end of the triangle.
Step six: now its time to start forming the butterfly, we will start with the bottom wings. Turn the open end of the triangle away from you.
Step seven: take on of the corners from the open end and fold it down to meet the top point of the triangle. Make sure not to grab both corners, or the butterfly's top wings will have creases in them.
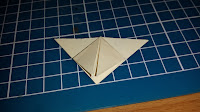
Step eight: do the same to the other corner. You should end up with something similar to the picture on the left, with what looks like a small square in the middle of a triangle. These two folded down flaps will be the butterfly's bottom wings!
Step nine: flip the whole thing over, so now the two corners you folded down are on the bottom and the plain triangle shape is facing the top.
Step ten: take the pointy end of the triangle and fold it upwards towards the open end. Make sure and fold it so the point is higher than the open edge. Doing this will pull up the other edges as well but this is ok, we want this to happen.
Step eleven: after you have folded the point to the top you need to flatten the shape. The bottom edges will have pulled up so you need to pull them back down and flatten them, it will make a small overlap of paper on the flap you pulled up in the previous step and look similar to the picture on the left. We're almost done!
Step twelve: once again flip the whole thing over, It should be starting to look like a butterfly now, and you should have a small triangle peeking out over the open edge of the top wings.
Step thirteen: fold this small triangle back over the open edge of the wings. this will keep the whole thing closed together without having to use staples or glue.
Step fourteen: fold the whole shape in half, along the line between the bottom wing flaps. Make sure the small triangle doesn't come unfolded during this because the butterfly will sort of fall apart.
Step fifteen: pinch the top where the triangle was folded over, with your fingers, and flatten. This will give you a butterfly body ans well as pull the wings away from each other slightly giving the whole thing a more butterfly feel.
Flip the whole thing over and you should have something that looks similar to the little butterfly pictured above!
Now you can decorate it however you like, add some antenna, draw on some spots.... make some different shapes and sizes and colors.... the possibilities are endless!
Next blog:
Instructions on how to make this adorable little bunny using a pattern that I found for free on pinterest!


