Search This Blog

Showing posts with label sew. Show all posts

Tuesday, August 13, 2013

Now I feel just like a kid again!


Meet my new project! Adult sized bunny slippers, and a matching beanie, because apparently this winter needs to test my ability to withstand frostbite...

If you want to try and make these yourself then the pattern is for sale in my Ravelry Shop! they are super easy, and super warm!

They make me feel like a little kid again, running around in bunny slippers... but they do make me miss the summer, and it being August it is supposed to be warm not almost freezing.... but being in Australia means that I get to go to the beach at Christmas instead...

On a different note, I am awaiting the start date for a new job, I got a new (well its an old desk but its new for me) which made a lot more space in my crafty room, we got our oven and hopefully it will be put in this weekend, we have started trying to teach Sade to do some tricks....  Which isn't going very well at all... apparently she thinks that "Shake!" means she should shove her face in your hand or roll over onto her back and kick you... but I'm sure we will get there in the end, and that will be one more thing I can cross off my bucket list! I wanted to put up a video of Lewy trying to teach her, but my blog is being a pain in the proverbials.... it only wants to let me do a video if I have a webcam hooked up and since the laptop died I haven't had the time to get one...

Also I have taken it upon myself to try and make backups of my stuff now, so my desktop is nice and neat and organized, all my pictures are in properly labeled folders, and my loose photos that still need to be scanned have all been filed away in what I'm hoping is chronological order... there are so many pictures I want to put up for family to see.... My cousin over at A Bookworm and a Baby is one of the ones who is in so many of these photos I have, and I'm not sure if she even would remember being in half of them.... but alas I need to get a scanner...

Here's hoping you are all having a great week!

XxX ~ Rah Rah


Thursday, June 27, 2013

Knitted Bunnies!

My Little Rabbit <3


 So here's the little knitted Rabbit I promised you all!
Isn't it just so freaking adorable? I absolutely love it to death and it even comes with some clothes! So as promised here's the pattern for it. I'm not sure whose patter it was originally (and I'm really sorry that I cant give credit where credit is due!) but I found this pattern on Pinterest, I clicked on the picture of the little teddy bear (yes there is a bear as well!) and it downloaded a .pdf file to my phone.... So I'm going to write it down for everyone (exactly as stated in the pattern I downloaded) And if you stumble across it somehow and it's your pattern please let me know!!

Head: Side A
cast on 12 sts. (start with a K row)
1. Inc 1 st st at each end of row. (14 sts)
2. P across
3. Inc 1 st st at beginning of row. (15 sts)
4. P across
5-10. Repeat rows 3 and 4 three times more. (18 sts)
11. Cast off 8 sts at beginning of row K to end. (10 sts)
Place marker at end of last cast off st.
12. P across
13. K across
14-15. Dec 1 st at each end (6 sts)
Cast off *P2tog at each end as u cast off

Side B
Cast on 12 sts (start with a P row)
1. Inc 1 at each end of row (14 sts)
2. K across
3. Inc 1 at beginning of row (15 sts)
4. K across
5-10. Repeat rows 3 and 4 three times more (18 sts)
11. Cast off 8 sts at beginning of row K to end (10 sts)
Place marker at last cast off st.
12. K across
13. P across
14-15. Dec 1 st at each end (6 sts)
Cast off  *K2tog at each end of row as u cast off

Head Gusset (Start at back of neck)
Cast on 3 sts.
1. p across
2. inc 1 st on each end (5 sts)
3-5. work in st st begin and end with a p row
6-9 repeat rows 2 through 5 one more time (7 sts)
10. inc 1 st at each end (9 sts)
11-23. work in st st begin and end with a p row
24-25 Dec 1 st each end (5 sts)
place marker at each end of this row
26-32. work in st st begin and end with a k row
Cast off *p2tog at each end of row as you cast off

To make up head:
Sew side pieces from tip of nose to chin. Insert head gusset matching markers (this is where the eye positions are) sew gusset in place.Gather neck edge adding extra stuffing if needed and secure. Make the indents and add the eyes. Then make the nose and mouth.

Ears for Rabbit:
work piece in garter stitch (make 2)
Cast on 5 sts
1. k across
2. k1 inc 1 in each following st to end (9 sts)
3. k across
4. k3 inc 1 in next st, k1, inc 1 in next st, k3 (11 sts)
5-17. k across
18. k4, k2tog, k5 (10 sts)
19-21 k across
22. k4, k2tog, k4 (9 sts)
23-30. k across
31. k2tog at each end of row (7 sts)
32. k across
33-36 repeat rows 31 and 32 two more times (3 sts)
37. k last 3 st together.
tie off. Fold cast on edge in half and stitch together

Ears for Bear:
work piece in garter stitch (make 2)
Cast on 8 sts leaving a long tail to sew to head
1-4. k across
5. Dec 1 st at each end of row (6 sts)
6. k across
Cast off

Body:
Cast on 15 sts (begin at neck edge)
1. k1, inc 1 in each following st to end (29 sts)
2-6. work in st st begin and end with a p row
7. {K6, inc 1} twice, k1, {inc 1, K6} twice (33 sts)
8-10 work in st st begin and end with a p row
11. k15, inc 1, k1, inc 1, k15 (35 sts)
12-16. work in st st begin and end with a p row
17. k15, skpo, k1, k2tog, k15 (33 sts)
18-20 work in st st begin and end with a p row
21. k14, skpo, k1, k2tog, k14 (31 sts)
22-24. work in st st begin and end with a p row
25. k1, {k2tog} to end (16sts)
26. p across
Cast off remaining 16 sts
Fold sides of body together, then sew cast off edge, gather neck by weaving yarn around neck edge then pull closed and secure. Sew back edge leaving an opening, stuff then close opening.

Legs: (make 2)
Cast on 12 sts
1. k1 inc 1 in each following st to end (23 sts)
2. p across
3. k1, inc 1, k7, inc 1 in next 6 sts, k6, inc 1, k1 (31 sts)
4-6. work in st st beginning and ending with p row
7. k13, k2tog, k1, skpo, k13 (29 sts)
8. p across
9. k12, k2tog, k1, skpo, k12 (27 sts)
10. p across
11. k7, cast off next 13 sts, k to end (14 sts)
12. p across
13. inc 1 at each end of row (16 sts)
14-20 work in st st begin and end with p row
21. {k1, skpo, k3, k2tog} twice (12 sts)
22. p across
23. {k1, skpo, k1, k2tog} twice (8 sts)
Cast off *{p2tog to end casting off as u go}
Sew instep, sole, back of leg and top seam, leave an opening to stuff, then close after stuffing.

Arms: (make 2)
cast on 6 sts
1. k1, inc1 in each following st to end (11 sts)
2. p across
3. k1, {inc 1, k2, inc 1, k1} twice (15 sts)
4-14. work in st st begin and end with a p row
15. k1, skpo, k9, k2tog, k1 (13 sts)
16-24. work in st st begin and end with p row
25. k1, {skpo, k1, k2togmk1} twice (9sts)
26. p across
cast off *k1, {k2tog} to end casting off as you go. Sew arm seam leaving an opening to stuff and then close.

To make up:
Sew head in position. It is a good idea to experiment with the ears before you sew them on. Attach arms and legs in the desired places.

The instructions for the clothing will come a little bit later =) but for now enjoy making some awesome bears and bunnies!

Wednesday, January 23, 2013

CTHULHU!!!!!

So it's finally here! I have decided to let it go for free!!!


Now you can find this pattern with a link to this blog in my Ravelry Shop, or on my Deviant Art Page.

And as promised the instructions to make this beautiful piece of work:

Cthulhu Ski Mask
Single needles (beginner’s ski mask)
Ski Mask:
Start with size 3 ¼ mm needles, cast on 180 stitches, stocking stitch four rows.
Switch to size 5mm needles and continue to work in stocking stitch until piece measures four to five inches long.
Switch to size 9 needles, continue to work in stocking stitch until piece measures approximately 11 inches long.
Switch back to size 5mm needles, stocking stitch two rows. Cast off 15 stitches from beginning of a wrong side row and knit to end. Turn work and cast off 15 stitches purlwise, purl to end.
Continue working in stitch for approximately 3 inches. Cast on 10 stitches at the beginning of a wrong side row, knit to end. Turn work and cast on 10 stitches purlwise and purl to end of row. (This will be the opening for the eyes in the ski mask)
Stocking stitch two rows, and then switch back to size 9mm needles. Work in stocking stitch decreasing on wrong side rows only, decrease evenly across the rows until only ten stitches remain.
Switch back to size 5mm needles and stocking stitch two rows, thread a yarn needle and pull remaining yarn through stitches on needle and pull tight. Use the yarn on the needle to stich closed from the top to the eye opening, and from the bottom of the eye opening to the end of the work.
Bridge cover (between the eyes)
Using size 5mm needles cast on 8 stitches, decreasing two stitches at a time stocking stitch until only four stitches remain, stocking stitch 3 rows, increasing 2 stitches per row stocking stitch until you have 8 stitches and cast off. This will be going in the middle of the eye opening.
Eyebrow Piece:
These are optional, you don’t have to make them if you are afraid they will obstruct your vision, or they will make the mask too uncomfortable.
Using size 5mm needles, cast on 20 stitches. Stocking stitch several rows, increasing stitches evenly across wrong side rows, increase to 40 stitches. Decrease to 10 stitches evenly across wrong side rows. Stocking stitch several rows, increase evenly to 40 stitches across wrong side rows, decrease to 20 stitches evenly across wrong side rows, stocking stitch several rows, cast off.
Fold piece in half and stitch closed all the way around. We are going to sew this over the eye opening for the eyebrows.
Tentacles!
So we will start off with some small tentacles. I used 3 ¼mm needles, casting on 10 stitches. Knit one stitch and increase 1 stitch to the end, purl one row, Knit 1 stitch and increase 1 stitch to end, purl one row, cast off. This will give you a very curly tentacle.
Repeat the same steps by casting on 20 and 30 stitches, this will give you longer versions of the tentacles.
Switch to size 5mm needles, and continue to make tentacles by casting on 10,20,30 stitches and following the same steps.
You can stop at any point when making the tentacles, because each mask will be individual, just keep increasing the size of the needles and continue to cast on 10,20,30 stitches until you have a mask which suits your tastes!


Sunday, November 4, 2012

Wands and Kitties!

Well things are finally starting to come along nicely with my Harry Potter gift bags.... now that I've actually finished all the bags I've made a startling discovery....

ALL THE STUFF ISN'T GOING TO FIT INSIDE THEM!

lol! But all is good because I will just make it into a couples goodie bag and put two or one of each thing in the bag (Don't worry I'll probably make those as well and they are easy as anything to do!)

We'll start this post off with the details of the magic wands.

I went to the local cheapy shop which is just down the street from me, and since it was Halloween time they had plenty of decorations to snag for a bargain! They had some basic plastic magical wands to use for costumes so I grabbed some of them and since they all looked the same I decided to make them all individual.

First thing is that its alright if you cant find a plastic wand there are heaps of tutorials on google to make them out of plain paper,this one is a good example!


You'll need to have some paper towel or toilet paper handy and some plain white glue that will dry clear. Mix the glue with an equal amount of water and then paint the plastic wand and start sticking on the toilet paper. Once you've covered it all set it aside to dry.
Now I wanted to make mine uniform in color, not identical but similar. So I used some black tissue paper and put a few layers over the paper towel in the same way.
And don't worry about getting it perfect the first time around because at this stage you can always cover up and places you have missed with a scrap of the paper you used on the last layer.

You can make them any way you like, to make each wand unique for myself I wrapped some bits of yarn in interesting patterns around them before I started the paper mache. After you have them looking the way you like then just add any extra details with some paint or a paint pen and cover the whole thing in a layer of glue (don't mix this layer with water though) and it will give the wand a shiny lacquered effect.

Now for the kitties!
 There is a free pattern for these kitties found here! but I'll go ahead and write it down on my own blog. (just giving credit where it's due!)

It makes three separate pieces which will need to be sewn together. I'll be using a yarn needle which you can get from any craft store where yarn is sold.
We'll go through this step by step so it's easier to understand.

The Body:
  1. Cast on 24 stitches of any yarn in any color in any type on any size needles. (the finished size of the kitten will depend on what type of yarn you have used and what size needles you need, but as we are stuffing this kitten make sure the knitting is tight so the stuffing doesn't peak through!) 
  2. Straight Knit 52 rows 
  3. Cast off.
Simple right? But it looks like a square of yarn. Fold it in half length ways, and make a stitch in the yarn to hold the place. Now you will have two more edges, and pull each of those to the middle and make a stitch to hold them in place. You should have four corners now and four openings to sew up. Sew up three of the openings and place some craft stuffing inside to fill out the body before sewing the last opening open.

The Head:

  1. Cast on 12 stitches in the same yarn you used for the body.
  2. Straight Knit 14 rows
  3. Knit 4 more rows but knit two stitches together at the beginning of each row. (this will give the head a tapered effect.)
  4. Now Knit 4 more rows but increase one stitch at the beginning of each row. (we're gonna fold the head in half!)
  5. Straight Knit 14 rows
  6. Cast off.
Now you have a shape that slightly resembles an hour glass right? Good! Fold the shape in half where the cast on and cast off edges are even. Stitch around the head, leaving a small opening to stuff, and be sure to stitch around the ears!
Now pick an end of the body and sew the back of the head to it!

The Tail:

  1. Cast on 14 stitches in the same yarn as the body and head.
  2. Straight Knit 7 rows.
  3. Cast off.
Sew the long edge together and across one of the short ends. You should have a small tube with one end sewn shut. If it is big enough you can stuff the tail, but it is not necessary. Sew the open end to the end of the body.

With some black yarn or thread sew on a little face and some whiskers and VIOLA!!! Your very own easy peasy knitted kitten! 

Saturday, September 15, 2012

Easy Peasy Sunglasses Bag

So I really REALLY fell in love with the material I got from Spotlight for the back of my Country Kitchen Apron, and I've been trying to find a use for as much of it as possible.

When I carried my sunnies around with my in my hand bag they always ended up really dusty and needed to be cleaned almost every time I put them on (which isn't a good thing when you're driving!)

So there was a pretty long piece of the material left over, and if I folded it then it was just the right width to hold my sunglasses. So I sewed it together up the sides, and using a pink sheet of felt cut out the same size and sewed up the sides of that to make the inside of the bag.
Next I got a small length of pink ribbon and folded it in half tying the ends in knots so they wouldn't get lost inside the bag if you pulled one side too hard.
I flipped the material inside out so the stitches are on the inside, and slipped the felt inside the material (leave the stitches on the outside).
Stick the ribbon between the two layers all the way around the bag, and then fold over a small lip on the material side of the bag. Sew all the way around the bag leaving just enough of an opening for the ribbon to slide in and out of, leave a gap between the ribbon and stitch the gap closed.

Easy Peasy! Just make sure you don't catch your ribbon in your stitches, then slide your sunnies inside and pull the ribbon tight and VIOLA!!! You have your very own sunglasses bag!

Saturday, July 14, 2012

No Rest for the Weary...

So here we are again.... the end of yet another horrid week involving high temperatures, chest infections, and delirium...
I've even been way to sick to even finish my current project.... however before I was infected with what feels like the plague, I managed to make my own GIR doll from Invader Zim! One thing to be happy about I guess.

Now I know its not the best in the world, but it is pretty darn close if  I do say so myself, completely 100% my own pattern, which as soon as we get a working scanner it will be uploaded for free! There were a few kinks to work out with the pattern but not to worry they have all been fixed up for my dear sweet viewers.
I have also finished Lewy's balaclava! However once I put the lining in it was a bit tight, but after a few times of wearing it it should stretch out some.

My current project is my own footstool companion cube. But since I've been sick this is as far as I've gotten with it, a pile of squares and love hearts lolz. It will get there though, then I'm bound and determined not to get distracted from finishing my Harry Potter bags.... I only have the Hufflepuff scarves and the Ravenclaw set to finish.

Now for a little while more I'm going to rest and recuperate  Hopefully I'm feeling up to finishing these projects soon!

Tuesday, June 5, 2012

The Long Awaited Robes!!!

(Just a disclaimer: This is not my video this is not me! I do not take credit for this work. I do take credit for the Slytherin robe which I made by following the instructions in this video that I found on Youtube)

So now as promised!!!! Here is the video I used to make my Slytherin Cloak for my Harry Potter night costume. Of course in the video they made a Gryffindor robe, the only difference is that instead of using burgundy I used green material.
In the video they used king size sheets, now I don't know about where you guys come from but here in Australia sheet sets do not come that cheap (especially king size ones!), so to save myself some money I just went out to a local craft shop and got a few meters of material, I used silk because I like the way it drapes and feels when you wear it, but you can really use any sort of material you like. You don't even have to make a Hogwarts Robe out of it, you can literally make any sort of robes you like following the simple instructions on the video!
One other little thing I did differently from the video is that I hand sewed the entire robe, I liked to be able to see my stitches and it really gives it that home made look, but you can use a sewing machine it will be a lot faster AND probably make it look a bit more professional.

The photo to the left is my finished product! You can tell from the video that I used different materials they are pretty shiny in the picture, but thats alright, this is a matter of personal tastes and you can use whatever you like!
Just remember when you are measuring your material you want to add a few inches to each measurement, especially if you are using a sewing machine because the foot will take up some of the length. The length of the whole robe is entirely personal. I made mine just long enough to reach the floor, but if you are short like me then there isn't really much you can do about things being too long. And the arms need to come over your hands, i added about 4 extra inches to my measurements so the robe wouldn't be too short when I raised my arms, and remember that they are supposed to be big, so remember to cut them that way! I cut mine like old witches robes where the sleeves kind of fan out, but I only made it subtle.
There are some little embellishments that I chose to use as well on my cloak. I added the hood just like from the video, but I also added a house patch and a clasp to close the robe.


To the left is the clasp I used. Just a simple rope clasp that I got from Spotlight for pretty cheap. Since I was hand sewing everything I thought it would be a bit easier for me to sew each side of the clasp onto a small square of black felt. That way I could just sew around the square instead of trying to make sure I caught all of the details and this way it also gives the clasp a bit more of a larger area, making sure that it holds tight and wont rip your material as easily, this is a good thing to try and do if you have a really long robe just in case you step on it. To the right is my Slytherin House Crest Patch. This one I bought off ebay for about $4 and just ironed it onto the material, but you could always make your own if you choose, there are a few tutorials on youtube that are good, but I wanted to save some time in finishing it.

So there you have it! The long awaited House Robes Blog is finally up and going places! I hope you enjoyed it!!!

Thursday, May 24, 2012

Never Leave Home without your Companion Cube!

Now, I know that last blog I promised a flashy new blog all on how to make your own hogwarts robes.... but lets face it I lied....

Not entirely though, I do have the robes sitting here in front of me, however after trying them on again they need a bit of tweaking, and I somehow managed to sew the clasp on WAY to high and now it crushes my windpipe when I close it. So this has to be fixed up, and soon, because its nothing but the best for my readers! See how much I love you? No shoddy photos or half attempted projects here!

Now for the last few days I have been sick with some virus flu type monstrosity... which had my sneezing and coughing and running a temperature, and totally NOT feeling up to sewing minute details onto silk, or using too much effort on anything at all, so I decided to keep myself busy while I was in bed, I would make a Portal themed project!

Introducing the Companion Cube from Portal.... in a handy take it anywhere you freaking feel like it size!

This Image here (with the hand) Is what I have made. The Image on the right is my reference which I got from HERE! It was fairly simply to make, required very little materials, and looks pretty darn awesome if I do say so myself!


So I started off with some of those needlepoint squares, the plastic ones.  As you can see in the next photo (also using my hand as a size reference for you all!) I'm not sure of what the proper name for these little babies are so If you know please comment on it for the other viewers! Then I had some pink yarn, light gray yarn, and dark gray yarn, and a black texter. Following the reference I marked out the pattern for each color, on 6 different squares, and started sewing until my heart was content. I used a large yarn needle that I had to pull through the holes, but don't worry these plastic thingies have plenty of give. It doesn't matter how the back of each square looks, it can be messy it can be neat, as long as you tie off your loose ends when you have finished using a color. I left some long tails of the light and dark gray yarn to stitch up the edges so it wouldn't look so lumpy. And be careful how tight you pull your yarn, even though the plastic has some give it can still break and this would be bad!
 Leave one of the edges open when you are stitching up your sides to finish, and you can put anything you like inside it. I just used some craft stuffing, but you can put anything inside it to make it weighted.

ENJOY!!! and believe me the Hogwarts Robe Tutorial is coming soon. I do apologize once again for delaying it, but as I said I was sick and didn't feel like fixing any of my problems just then.

Don't forget to watch my Deviant Art Page, everything that goes up here also goes up there so it would be a good way to keep track of my entrees!

Wednesday, May 9, 2012

Le Hufflepuff Bags!


So once again I present to you the Hufflepuff Bag Set (free pattern by clicking here)! I'm still working on the scarves but they will be up soon.
Now you may notice that this set of bags differs a bit from the others, this is because I used two different types of yarn. The black yarn is just a normal 12 ply where the yellow is the very soft baby type yarn used to make blankets or baby clothing....
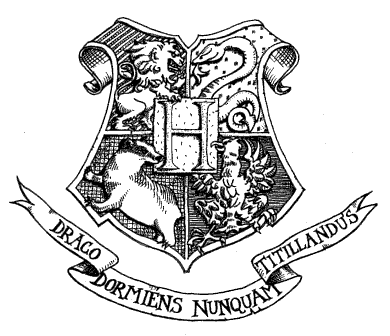
This made it difficult to do the fringe at the bottom, as every time I tried to pull a bit of yellow yarn through I ended up pulling the fluff off of it and was left with a few threads, so the fringe for the hufflepuff bag is a solid color, and the fringe on the scarves will be the same.  Lately I have also been looking around for some decoration ideas. I have found quite a few! There's the Hogwarts Crest that I have put on the top of my invitational letters, and used GIMP2 to turn it a nice green color to match the ink in the movies. There's the Potion Bottle Labels that I plan on using for my lollies and drink bottles, which will be easily done. I plan on getting a few of the glass water bottles from a cheapy shop and placing a label on it for drinks, and getting a few of the glass jars for the lollies.
There are the Butter beer labels which you can print off for free, and I will also be putting those on some of the water bottles, but I plan on getting some glass beer mugs and placing a label on each one of those as well, as a party favor for my guests.


I do also have my slytherin cloak finished entirely now, but as I am home by myself at the moment and would need someone to model it for me.... well it will just have to wait until some one else gets home, because I highly doubt that any one wants to see it on my puppy! There will be an awesome step by step video for the next blog so stay tuned!

Wednesday, August 10, 2011

Let there be cake!

What could be more appetizing than a nice gooey slice of chocolate cake? Nothing thats right!
This little beauty was made from felt, hand stitched and fabric paint gooey-ness...

What to do? This one is so simple you dont even need a pattern, cut out two triangles thats the size of the slice you would like, brown for chocolate cake, white for vanilla, pink for strawberry.... or go all out and make a multicolored rainbow cake!
Next, cut a few strips for the layers of your cake long enough to go around the two large edges of your triangles, and then cut a few strips of the "cream" to go between the layers of cake. Sew these strips in a cake/cream pattern until you run out of cake layers.
Next cut an icing layer that is as wide as the short edge of your triangles, and as long as all of your layers once they have been sewn together, this will be the back of your cake icing.
Cut out a number, or numbers from your choice of colors, a strip of white, and a flame shape from some yellow, this will be your candle. The cherry is optional, but its just a red circle and a green strip of felt.
You will also need some ribbons so you can wear it as a hat, or if you just want it as a toy forget the ribbon.. Now for the interesting part: the assembly.
1. Take the ribbons, if you are using it, and sew one end of it to each long edge of the triangle you will put on the bottom of the cake.
2. Make the candle: Sew the flame together and turn it inside out, sew the white strip together and attach the flame to it this will be the candle wick, place the wick and flame inside the number and sew the number together leaving an opening at the bottom to flip it right side out, leave this open.
3. Cut a small opening in the top of the cake and place the open end of the candle into the opening. Sew this shut from the underside of the cake top. 
4. Take the layers and the top part of the cake, sew the layers around the two long edges of the triangle, this will make up your slice.
5. Take the back of the slice and sew across the top of the cake, and down each side of the layers, this will make up the icing.
6. Sew the bottom triangle on, the same way you did the top of the cake, but leave the back edge open so you can flip it right side out.
7. After flipping it right side out, make sure all your points are pointy and then stuff it with craft stuffing until you're hearts content. Then sew up the bottom back edge.
8. Add your details, this means using the fabric paint which will make your cream look a little more creamier, or look like chocolate/caramel sauce drizzled over the top.

To make the cherry, single stitch around the edge of the red circle and pull semi-tight. Add some stuffing and pull the thread tight, add the green strip of felt to the opening and sew shut, then tack it to the top of the cake.

And there you have it, your own personal slice of cake, now you really can have your cake and eat it to!

Tuesday, August 9, 2011

Nothing better than a birthday!

Alright So I know this has nothing to do with Harry Potter, but I still think its worth an honorable mention. Sunday I am attending a very special little girl's FIRST birthday ever, and I have decided that the whole "eat it or wear it" saying needs to be put into motion.
Since most little ones feel the need to grab handfuls of everything and shove it straight into their mouths (which we dont want her doing to the cake) I have decided to make something she can wear that will look almost as good!
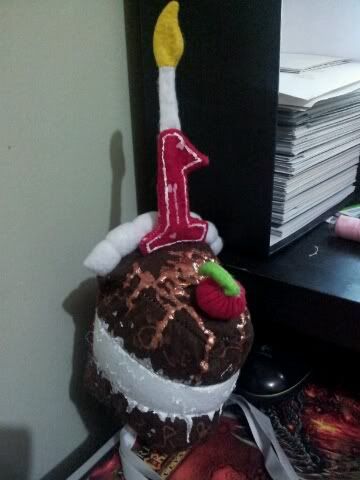
We are talking about the exclusive CAKE HAT!!!! It's a big slice of chocolate cake, with a big dollop of vanilla ice cream melting and oozing down the sides, with a great big #1 candle on top. Mind you it will all be made of felt so she can chew on it 'till her little hearts content and no one will be upset that there is handfuls of real cake missing and smeared all over her face and clothes....
There will be a photo put up as soon as it's finished, and yes I am still on Hiatus from the Harry Potter themed objects until we get settled in and unpacked lolz, this is just being made from some bits and pieces I had laying around.

Friday, August 5, 2011

The Bag Lady...

So I have been working on some House Bags (<-- pattern found at that link) And I must say they are a lot harder than they look. Since I am only a beginner knitter I haven't really figured out how to "work in the round" just yet so I am just straight knitting them and sewing them together after I am finished.

I've started off with the Gryffindor House bag (The first pattern on the link above) and at the moment I am about 1/4 of the way finished with it, it really is a good thing this movie shindig is a few months away at least! I'm sure  I would have been further along with my knitting projects had I not spent so much of my time creating the house elf pattern and trying to perfect it, however since putting the pattern up on my deviant art page it has been added to a few groups which feature various patterns and I have been informed that a few people are actually going to attempt to make one themselves! I'm sure you must all know how good that feels to know that people are attempting to recreate something you have made for them,  I'm just appreciative that people have taken the time to look at it and the fact that they want to try and make it themselves is just the icing on the cake!
My friend Katie (who has admitted to me that she is a horrible sewer) has commissioned me to make her one of her very own, and I have been informed by a few people that I should create two of them and give them to her as a wedding present since she is the biggest Harry Potter Fan Girl that I know (besides myself when it comes to Tom Felton *drools*) I have considered doing this for her however, I'm not sure if I would actually be able to make two of them by the time her wedding comes around since I am still in the middle of searching for a job and having to drive back and forth to interviews all day long... Still it seems like an intriguing idea.

Any ways back to the bag! Yes the bag, I have been using size 4 needles, red and yellow Oki Angora Delux Yarn which is 70% Goat Hair and 30% PAC. and I have discovered that if you intend on using the double needle method as I have decided to do then you cannot just start the pattern from the beginning of each row as I thought, you need to work from the first to last stitch of one row and the last to first stitch of the next row in order to have the pattern turn out right, otherwise it will be very messy and all over the place, trust me I have had to restart it once already because I made this mistake!
That's all for the time being, just thought I would let you all know what I was working on at this particular moment in time, will update you all again once I have finished the first bag and I will be sure to include some photos!!!

Wednesday, August 3, 2011

The House Elf Correction (my bad!)

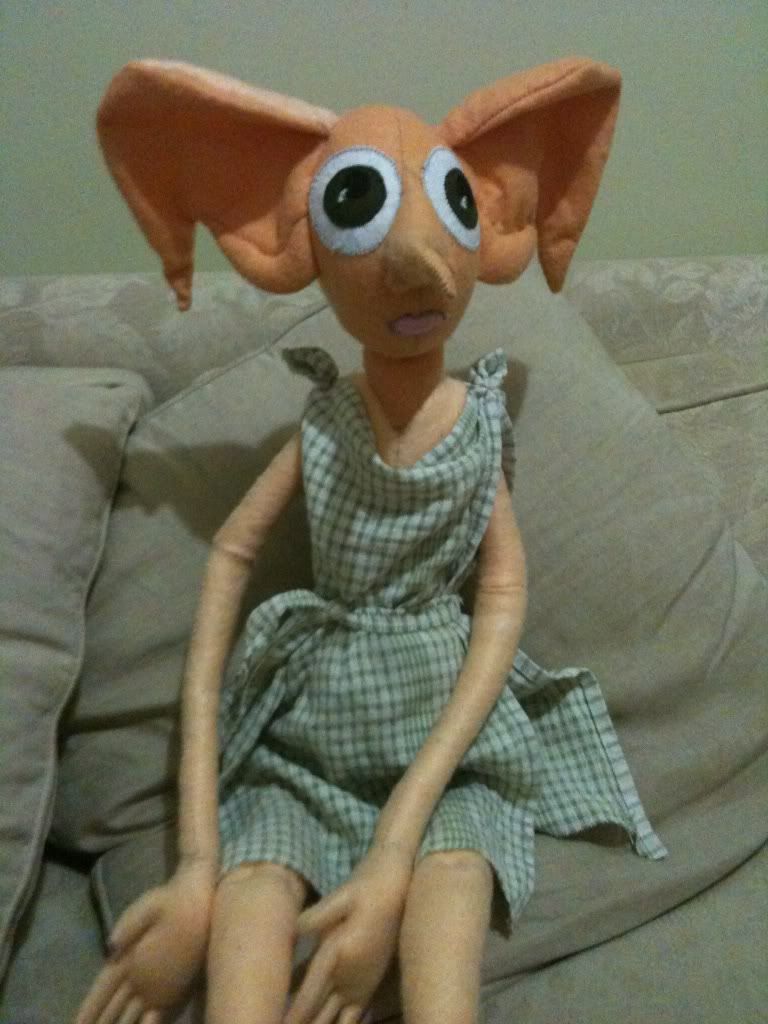
So after sewing and falling in love with my house elf plushie doll, I was having trouble figuring out what to make the eyes out of.... I foolishly told all of you to use polymer clay, this was a HUGE mistake! Dont listen to that information what you really needed to do was to make your eyes out of felt. I found a wonderful tutorial on how to make realistic felt eyes on deviant art, This tutorial will help you if you dont know how to make them yourself! I will admit I had no clue how to make them I tried the polymer clay method and it looked atrocious!

I suggest that from now on you just ignore anything I say regarding polymer clay usage unless I put up whole lessons on how I make things using it. For our own good lolz! I also had to make the mouth using felt, it doesnt look that great however, I couldnt find a tutorial on how to make a realistic mouth out of felt.

To top it off I used an old tea towel cut in half and tied at the ends for the clothes. I stitched it in place at the shoulders just to stop it from coming off, and cut another strip off the remaining bit of the tea towel to use as a belt. The good thing about this is that their clothes are supposed to look shabby so it's not that big of a deal for you to use random scraps you have laying around, whether they are a bit dirty or even if they have a hole or stain!
Hope you all have enjoyed this House elf experience! If you make one please let me know how it turns out, and remember you can make and sell as many as you like but please dont try and sell the pattern I made it free for a reason!

Monday, August 1, 2011

Finally Finished the House Elf

Well it's about time right? Yes I know you have all been waiting.... well at least I hope you have been. I have finally finished the pattern and sewn the doll together.


The pattern is available on my deviant art page, I had to scan it and it would not fit on a single page so it is in four parts. Part 1 Part 2  Part 3 Part 4 (sorry its a little scribbled just cut out the pieces around the black line) I hand sew the pieces together so if you do not plan on doing this I would give ample room around the pattern to allow for a machine seam.
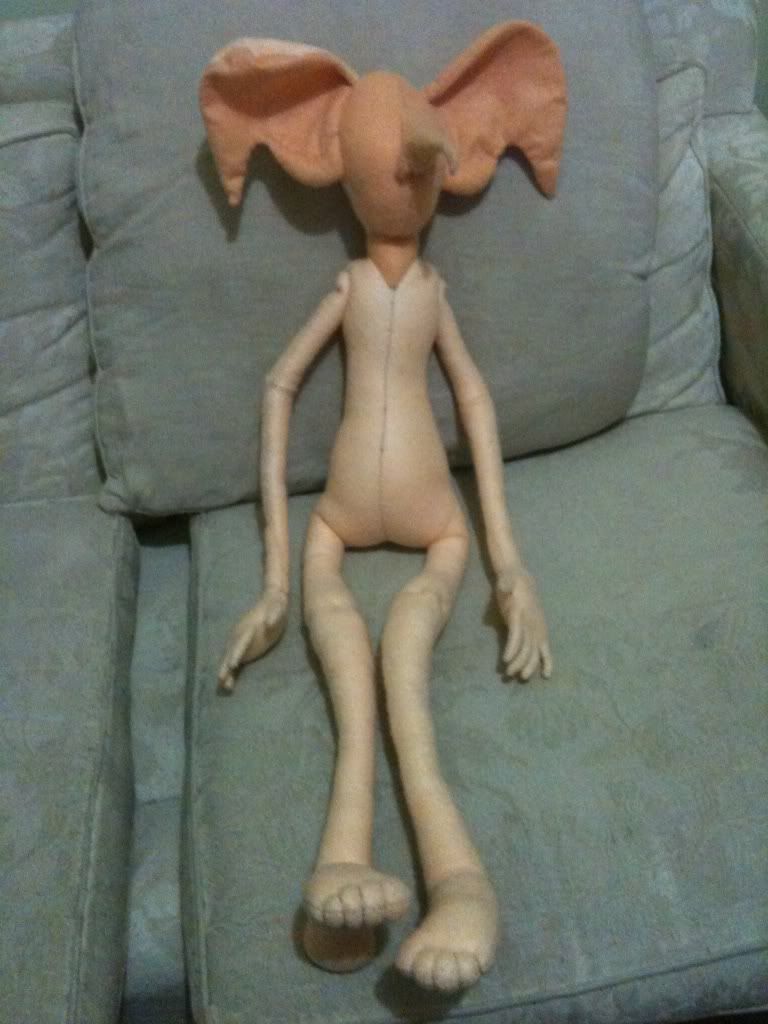
The finished product (before the eyes and clothing have been added should look similar to the photo added!

I had to use about 8 sheets of flesh colored felt, where I traced the pattern pieces onto them to save as much space as possible. While the pattern is pretty much self explanatory I will still share a few helpful hints. When working with the hands and arms, the best course of action is to sew the hands and turn them right side out, then sew the arms and attach them to the wrists. The fingers are hard to turn, I suggest using a  pin to coax them up so you don't rip your seams or your felt, or you can try using a small long object that is rounded on the end such as a crochet hook because this will also not poke holes in your material. Leave an opening at the back of the body so you are able to stuff and turn out the rest of the body, stuff it so it is as hard or as soft as you wish and then sew up the back. 
After you have finished the body it's time for the little details such as the knees/toes/elbows. These are quite simple and as the pattern suggests where you should put them (the elbows and knees have been slightly enlarged to stand out (as they do on Dobby the House elf from Harry Potter), and as you can see from the image I have added where to put the toes. The arms will need to be attached separately, this is so they can move freely like a normal doll's arms would move, and this can be achieved by using flesh colored thread and a doll needle (the really long ones you can get from any craft shop)

As for the eyes, I have chosen to use polymer clay. White clay for the eyeball, brown for the iris, and black for the pupil then hot glued them to the face. Then you just take some light pink fabric paint and use it to paint on a mouth, or you can embroidery it if you are good at sewing, take some scrap material or a shabby pillow case and use it for a tunic, you can choose to make a belt if you wish!

And there you have it, a free pattern and instructions on how to make your very own house elf from harry potter! If you have any questions just leave it in the comments and I will try my best to answer it!

Still on the menu so to speak: more golden snitches and mice, as well as some house bags and magic wands!

Thursday, July 28, 2011

The House Elf Part 1

Well today I have officially finished the House Elf's head. It took a bit of tweaking but now it looks really good (wont know for sure until I have it fully stuffed though and  I cant do that until after I finish his body). I'm working on his legs now, since they have to be sewn to the body.
I'm using beige thread and a regular sewing needle, poly-fill craft stuffing, and flesh colored felt sheets. I wont put a photo up of just his head though (especially since I haven't figured out what to use to make his eyes yet), I will wait until I have the finished product ready to show you.

I am however despising the fact that I have went over my internet downloads for the month and my net speed has been cut down to dial up speed... I feel like I am living in cave man times! My computer room is a total mess because while I am waiting for pages to load and killing time I am either knitting or sewing away like a tiny little machine, much to the disapproval of my fiance who is constantly trying to clean everything up only to have me come right back in and start "working" on another piece... not to say it isnt tidy, its just organized chaos I know where everything is and its all over the place!

I give it about three or four more days until I will have this little dude finished though. I have used a combination of Dobby and Kreature as references for my house elf, and since we never really saw Winky from the Goblet of Fire book I cannot be sure if a female house elf would look much different from a male. I guess this ones gender will greatly depend on what its eyes and mouth look like... Photos to come soon I hope! And once again remember once I have it up the pattern will be free to any one else who feels like they want to take on the task of creating their own little house elf!

Wednesday, July 27, 2011

The Golden Snitch

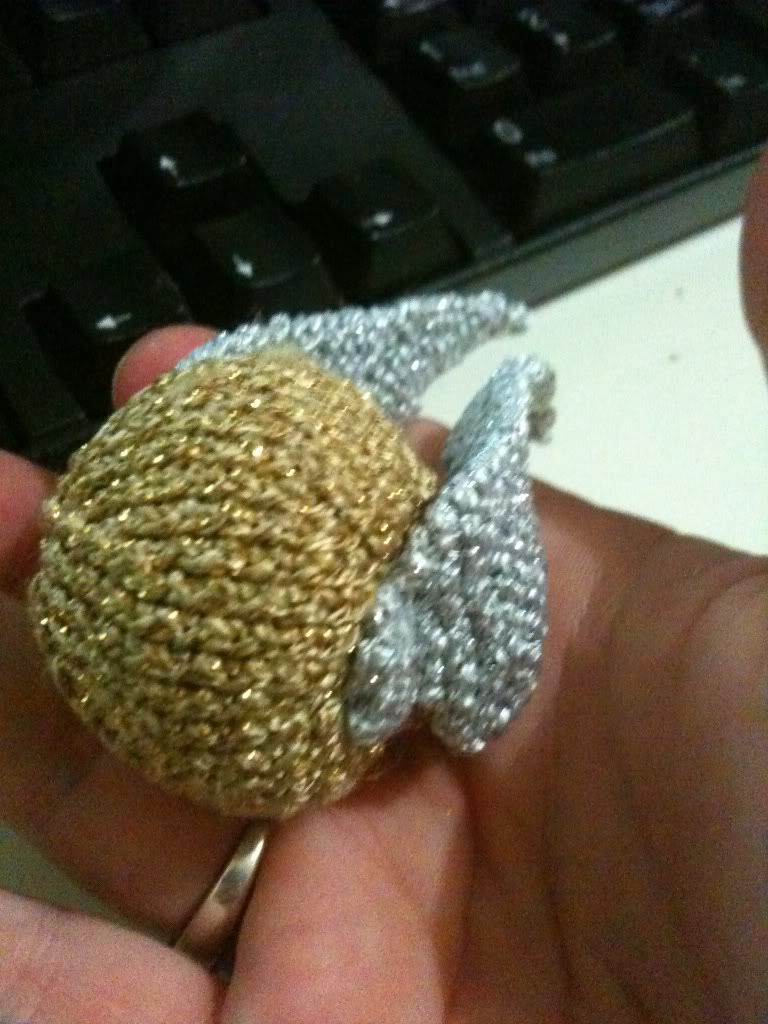
Yet another Harry Potter themed object! This time it's a golden snitch, just like the first one Harry caught in his first game of Quiddich! Free Pattern Available Here! This was a very fun pattern to make, and very simple. I have made this one out of two different yarns and this one is the one that looks best. I made this one with size 2mm needles, using Moda Vera yarn 75% Viscose 25% Metallic  the ball is made from gold and the wings from silver. This was a very hard yarn to work with however, the metallic strand incorporated into the yarn hurt my fingers a bit while holding the yarn, but it gave it a very nice finished look!
One more pattern that has been approved for my Harry Potter goodie bags (the one I'm making for each guest attending my movie marathon once the last DVD comes out!)  I'm still trying to perfect my House Elf pattern working on getting the face to look right, and I havent figured out what to use for the eyes just yet.... Its proving to be a bit difficult, from looking at the photos on google images I'm looking at making HUGE eyes on a smallish face, I'm a little bit worried that using polymer clay is not going to make the cut for making eyes, and I cant figure out where to get dolls eyes at any shop. Will have to make several attempts at creating them I'm sure... but we will get there eventually =) Any tips would be much appreciated!

As I said I'm still working on the pattern and creation of the House Elf, the pattern will still be free to you all once I get it right.
And I'm still looking for a nice cat, owl, and magical wand pattern to put in my goodie bags.  I will keep you all updated on the progress!