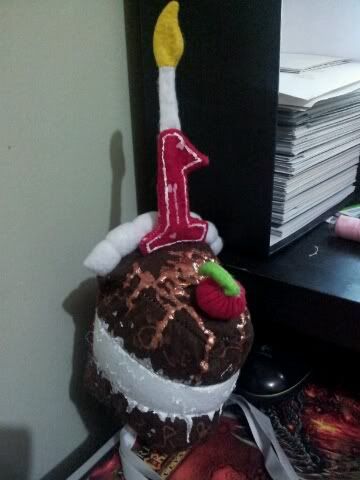
This little beauty was made from felt, hand stitched and fabric paint gooey-ness...
What to do? This one is so simple you dont even need a pattern, cut out two triangles thats the size of the slice you would like, brown for chocolate cake, white for vanilla, pink for strawberry.... or go all out and make a multicolored rainbow cake!
Next cut an icing layer that is as wide as the short edge of your triangles, and as long as all of your layers once they have been sewn together, this will be the back of your cake icing.
Cut out a number, or numbers from your choice of colors, a strip of white, and a flame shape from some yellow, this will be your candle. The cherry is optional, but its just a red circle and a green strip of felt.
You will also need some ribbons so you can wear it as a hat, or if you just want it as a toy forget the ribbon.. Now for the interesting part: the assembly.
1. Take the ribbons, if you are using it, and sew one end of it to each long edge of the triangle you will put on the bottom of the cake.
2. Make the candle: Sew the flame together and turn it inside out, sew the white strip together and attach the flame to it this will be the candle wick, place the wick and flame inside the number and sew the number together leaving an opening at the bottom to flip it right side out, leave this open.
3. Cut a small opening in the top of the cake and place the open end of the candle into the opening. Sew this shut from the underside of the cake top.
4. Take the layers and the top part of the cake, sew the layers around the two long edges of the triangle, this will make up your slice.
5. Take the back of the slice and sew across the top of the cake, and down each side of the layers, this will make up the icing.
6. Sew the bottom triangle on, the same way you did the top of the cake, but leave the back edge open so you can flip it right side out.
7. After flipping it right side out, make sure all your points are pointy and then stuff it with craft stuffing until you're hearts content. Then sew up the bottom back edge.
8. Add your details, this means using the fabric paint which will make your cream look a little more creamier, or look like chocolate/caramel sauce drizzled over the top.
To make the cherry, single stitch around the edge of the red circle and pull semi-tight. Add some stuffing and pull the thread tight, add the green strip of felt to the opening and sew shut, then tack it to the top of the cake.
And there you have it, your own personal slice of cake, now you really can have your cake and eat it to!

