
So I know lately I've been working on my Harry Potter things, but I have decided to take a little break from all that (we don't want to get bored do we?).
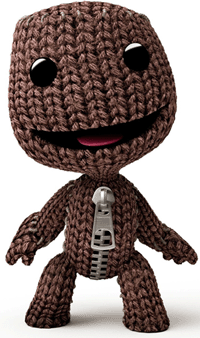
Here we have the marvelous Sackboy from the very fun playstation game Little Big Planet!

.jpg)
This one to the left is the doubled size version. He's about 1.5 feet tall, and yes I know the photo is not the best, but I couldn't find big enough buttons for his eyes and now he looks creepy.
The photo on the right (the gray one with the play station remote) Is the size of the doll you will get if you follow the pattern given from
HERE! As much work and effort as I put into the double sized version I really do prefer the original one, he's just so much more adorable!
If you are feeling up to the task I will give you the pattern I used to make the big one.
Head
Cast on 24 stitches
purl one row
knit one row
(increase 2, increase 2, knit 2) to end
(gives you 40 stitches total)
purl one row
knit one row
purl one row
(increase 2, knit 2) to end
(gives you 60 stitches total)
purl one row
knit one row
purl one row
(knit 2, increase 2, knit 2) to end
(gives you 80 stitches total)
purl one row
knit one row
purl one row
(knit 2, increase 2, knit 4) to end
(gives you 100 stitches total)
purl one row
knit one row
purl one row
(knit 4, increase 2, knit 4) to end
(gives you 120 stitches total)
purl one row
knit one row
purl one row
(knit 4, increase 2, knit 6) to end
(gives you 140 stitches total)
stocking stitch 7 rows
(knit 12, knit 2 together, knit 2 together, knit 12) to end
(gives you 130 stitches total)
stocking stitch 7 rows (beginning and ending on purl rows)
(knit 12, knit 2 together, knit 2 together, knit 10) to end
(gives you 120 stitches total)
stocking stitch 7 rows (beginning and ending on purl rows)
(knit 10, knit 2 together, knit 2 together, knit 10) to end
(gives you 110 stitches total)
stocking stitch 7 rows (beginning and ending on purl rows)
(knit 10, knit 2 together, knit 2 together, knit 8) to end
(gives you 100 stitches total)
stocking stitch 7 rows (beginning and ending on purl rows)
(knit 4, knit 2 together, knit 2 together, knit 2) to end
(gives you 80 stitches total)
purl one row
knit one row
(purl 2 together, purl 2 together, purl 4) to end
(gives you 60 stitches total)
stocking stitch 4 rows
(knit 2, knit 2 together, knit 2 together) to end
(gives you 40 stitches total)
purl one row
knit 2 together to end
(gives you 20 stitches total)
break the yarn off leaving a long tail, using a yarn needle thread yarn through remaining 20 stitches and pull tight, and use tail to stitch up head to neck. Stuff head.
Body
cast on 24 stitches
knit one row
purl one row
knit one row
purl one row
knit 2, (increase 2 x6 times), knit 6, (increase 2 x6 times), knit 4
(gives you 36 stitches total)
purl one row
knit one row
purl one row
knit 2, (increase 2, knit 2 x6 times) knit 6, (increase 2, knit 2 x6 times), knit 4
(gives you 48 stitches total)
purl one row
knit one row
purl one row
(knit 4, increase 2 x6 times), knit 10, (increase 2, knit 4 x6 times), knit 2
(gives you 60 stitches total)
stocking stitch 26 rows
(knit 4, knit 2 together, knit 2 together, knit 2) to end
(gives you 48 stitches total)
purl one row
knit one row
purl one row
(knit 2, knit 2 together, knit 2 together, knit 2) to end
(gives you 36 stitches total)
purl one row
knit one row
purl one row
(knit 2, knit 2 together, knit 2 together) to end
(gives you 24 stitches total)
purl one row
knit one row
purl one row
(knit 4, knit 2 together, knit 2 together, knit 4) x2 times
(gives you 20 stitches total)
cast off
Using the zipper start at the cast off end, sew around the zipper attaching it to either edge making sure that it covers the length of the body (overhang is fine at the top as you can tuck it into the head and you wont see it). Once the zipper is secured sew the body to the head it does not matter which way it faces. Open the zipper and stuff the body, when re-zipping the zipper add some glue to the teeth, this will make sure the zipper cannot be opened again (especially good if you are making this for a child)
Arms (make 2)
cast on 12 stitches
purl one row
increase into every stitch
(gives you 24 stitches total)
stocking stitch 27 rows
cast on an extra 6 stitches at the beginning of the next two rows
(gives you 36 stitches total)
cast off 6 stitches at the beginning of the next two rows
(gives you 24 stitches total)
stocking stitch 4 rows
Fingers
knit 15 work these stitches only
purl 6 work these stitches only
knit one row
purl one row
knit one row
break yarn, leaving a 60cm tail. Using a yarn needle thread the tail through the 6 stitches and pull tight, sew down edge of finger and continue knitting using the tail of yarn.
RING FINGER
knit 3 from left needle and work these 12 only
purl 6 and work these only
knit one row
purl one row
knit one row
Using a yarn needle thread the tail
through the 6 stitches and pull tight, sew down edge of finger and
continue knitting using the tail of yarn.
MIDDLE FINGER
knit 2 from left needle work these 12 only
purl 6 stitches work these only
knit one row
purl one row
knit one row
Using a yarn needle thread the tail
through the 6 stitches and pull tight, sew down edge of finger and
continue knitting using the tail of yarn.
INDEX FINGER
knit 4 from left needle
stocking stitch 4 rows
Using a yarn needle thread the tail
through the 6 stitches and pull tight, sew down edge of finger and
continue knitting using the tail of yarn. Using the tail, continue to sew the edge of the hand, stuff and close the opening, then sew to the edge of the body. Remember to make sure that you're thumb is pointing out!
Legs (make 2)
cast on 16 stitches
increase into every stitch
(gives you 32 stitches total)
purl one row
knit one row
purl one row
(increase 2, knit 2) to end
(gives you 48 stitches total)
stocking stitch 7 rows
(knit 2, knit 2 together, knit 2 together) to end
(gives you 32 stitches total)
stocking stitch 23 rows
knit 2 together to end
(gives you 16 stitches total)
break yarn, leaving a long tail. Using a yarn needle thread the tail
through the stitches and pull tight, sew down edge of leg, stuff and close opening and sew to body

Taking a contrast color make some little X's around the bottom of the legs near the feet, around the wrists of the arms, and around the top of the head. Stitch a cute little mouth, and if you can find them use some really large buttons for the eyes. If you cant find large enough buttons you can always cut out circles of felt and use that!
Remember this is the pattern for the large doll. The pattern for the normal size doll can be found by clicking the link above!



.jpg)


