Search This Blog

Showing posts with label chocolate. Show all posts

Thursday, March 28, 2013

Happy Easter!!!!!

Happy Easter!!!!!

So I decided to finally try something I found on Pintrest, it sounded decadent, to die for.... absolutely yummy!!! And it's easy as pie (literally XD)

So here's what you need:
  • 8-12 Hollow Chocolate Easter eggs (you can use white for a more realistic effect)
  • 1 tub of cream cheese (at room temperature)
  • 1/4 cup of powdered sugar
  • 1/2 teaspoon lemon juice
  • 1/2 teaspoon vanilla extract (please use the good stuff!)
  • 1/2 cup thickened cream
  • 2 teaspoons of peach juice (or 1 whole passion fruit without seeds)
  • 1 tablespoon apricot jam
  • 1 tablespoon butter
And the Directions! (including pictures of my attempt at making them!)

  1. If your eggs are wrapped in foil uncover the top of them,  leave the wrapper on them to give some color pop and to help them stay cool longer (If you live down in Aus you will know its still hot enough to melt chocolate at Easter time!)
  2. Using a serrated knife you will need to cut the tops off the eggs. This can prove to be a bit difficult, if you would like a smooth hole then you can heat up the knife before cutting, if you would like a ragged hole like you had started peeling the egg then try and break some pieces off the top (this is what I did)
  3. Put the eggs in the fridge so they do not melt, and now its time to start making the cheesecake mix!!
  4. In a large bowl mix the cream cheese, powdered sugar, lemon juice, and vanilla extract together using an electric mixer beat on high for 3-4 minutes or until light and fluffy.
  5. In a smaller bowl mix the thickened cream with the electric mixer until it forms stiff peaks.
  6. Whisk the whipped cream into the cream cheese mixture until it is smooth and velvety.
  7. Pipe or spoon the cream cheese mixture into the holes you made in the eggs. Fill them all the way to the top! But be careful not to spill much over the sides.
  8. Put the eggs in the fridge to set. The should take about an hour or so, I left mine over night to just make sure they were all the way set.
  9. After they have been set, remove them from the fridge, using a small spoon scoop out some of the cheese cake from the top, making a little hole. This is where the "yolk" will go.
  10. In a small pan, put the butter, jam, and passion fruit or peach juice, and whisk it over a low heat until the butter has melted and the mixture is smooth. It should look really yellow, but you can add some yellow food coloring if you like.
  11. Spoon the jam mixture into the cheese cake hols you made in the eggs. It will be s bit runny, but will set nicely.
  12. When you have filled up all the eggs put them in the fridge to set for at least half an hour, I left mine to set over night again....


I was so tempted to eat them straight away!
The good thing about these is that they aren't too sweet, the cheese cake mix does not need to be baked, but it is still light and fluffy while not being too cheesy. The jam and the chocolate add a nice sweetness to it but the cheesecake its self is understated. These were so much fun to make and took hardly any time at all to do, the only issue I had was that I had left over cheesecake!

But there you have it, you now have the recipe for Cheesecake Filled Chocolate Easter Eggs, easy peasy to do, super fun for kids, and a wonderful desert for after dinner! Hope everyone enjoys their Easter weekend as much as I will!!!

XxxX
Rah Rah <3


Wednesday, August 10, 2011

Let there be cake!

What could be more appetizing than a nice gooey slice of chocolate cake? Nothing thats right!
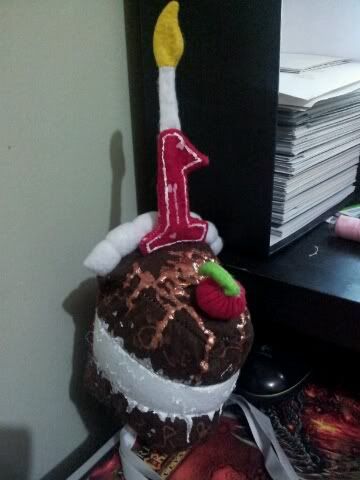
This little beauty was made from felt, hand stitched and fabric paint gooey-ness...

What to do? This one is so simple you dont even need a pattern, cut out two triangles thats the size of the slice you would like, brown for chocolate cake, white for vanilla, pink for strawberry.... or go all out and make a multicolored rainbow cake!
Next, cut a few strips for the layers of your cake long enough to go around the two large edges of your triangles, and then cut a few strips of the "cream" to go between the layers of cake. Sew these strips in a cake/cream pattern until you run out of cake layers.
Next cut an icing layer that is as wide as the short edge of your triangles, and as long as all of your layers once they have been sewn together, this will be the back of your cake icing.
Cut out a number, or numbers from your choice of colors, a strip of white, and a flame shape from some yellow, this will be your candle. The cherry is optional, but its just a red circle and a green strip of felt.
You will also need some ribbons so you can wear it as a hat, or if you just want it as a toy forget the ribbon.. Now for the interesting part: the assembly.
1. Take the ribbons, if you are using it, and sew one end of it to each long edge of the triangle you will put on the bottom of the cake.
2. Make the candle: Sew the flame together and turn it inside out, sew the white strip together and attach the flame to it this will be the candle wick, place the wick and flame inside the number and sew the number together leaving an opening at the bottom to flip it right side out, leave this open.
3. Cut a small opening in the top of the cake and place the open end of the candle into the opening. Sew this shut from the underside of the cake top. 
4. Take the layers and the top part of the cake, sew the layers around the two long edges of the triangle, this will make up your slice.
5. Take the back of the slice and sew across the top of the cake, and down each side of the layers, this will make up the icing.
6. Sew the bottom triangle on, the same way you did the top of the cake, but leave the back edge open so you can flip it right side out.
7. After flipping it right side out, make sure all your points are pointy and then stuff it with craft stuffing until you're hearts content. Then sew up the bottom back edge.
8. Add your details, this means using the fabric paint which will make your cream look a little more creamier, or look like chocolate/caramel sauce drizzled over the top.

To make the cherry, single stitch around the edge of the red circle and pull semi-tight. Add some stuffing and pull the thread tight, add the green strip of felt to the opening and sew shut, then tack it to the top of the cake.

And there you have it, your own personal slice of cake, now you really can have your cake and eat it to!

Tuesday, August 9, 2011

Nothing better than a birthday!

Alright So I know this has nothing to do with Harry Potter, but I still think its worth an honorable mention. Sunday I am attending a very special little girl's FIRST birthday ever, and I have decided that the whole "eat it or wear it" saying needs to be put into motion.
Since most little ones feel the need to grab handfuls of everything and shove it straight into their mouths (which we dont want her doing to the cake) I have decided to make something she can wear that will look almost as good!
We are talking about the exclusive CAKE HAT!!!! It's a big slice of chocolate cake, with a big dollop of vanilla ice cream melting and oozing down the sides, with a great big #1 candle on top. Mind you it will all be made of felt so she can chew on it 'till her little hearts content and no one will be upset that there is handfuls of real cake missing and smeared all over her face and clothes....
There will be a photo put up as soon as it's finished, and yes I am still on Hiatus from the Harry Potter themed objects until we get settled in and unpacked lolz, this is just being made from some bits and pieces I had laying around.