Search This Blog

Showing posts with label sewing. Show all posts

Tuesday, August 13, 2013

Now I feel just like a kid again!


Meet my new project! Adult sized bunny slippers, and a matching beanie, because apparently this winter needs to test my ability to withstand frostbite...

If you want to try and make these yourself then the pattern is for sale in my Ravelry Shop! they are super easy, and super warm!

They make me feel like a little kid again, running around in bunny slippers... but they do make me miss the summer, and it being August it is supposed to be warm not almost freezing.... but being in Australia means that I get to go to the beach at Christmas instead...

On a different note, I am awaiting the start date for a new job, I got a new (well its an old desk but its new for me) which made a lot more space in my crafty room, we got our oven and hopefully it will be put in this weekend, we have started trying to teach Sade to do some tricks....  Which isn't going very well at all... apparently she thinks that "Shake!" means she should shove her face in your hand or roll over onto her back and kick you... but I'm sure we will get there in the end, and that will be one more thing I can cross off my bucket list! I wanted to put up a video of Lewy trying to teach her, but my blog is being a pain in the proverbials.... it only wants to let me do a video if I have a webcam hooked up and since the laptop died I haven't had the time to get one...

Also I have taken it upon myself to try and make backups of my stuff now, so my desktop is nice and neat and organized, all my pictures are in properly labeled folders, and my loose photos that still need to be scanned have all been filed away in what I'm hoping is chronological order... there are so many pictures I want to put up for family to see.... My cousin over at A Bookworm and a Baby is one of the ones who is in so many of these photos I have, and I'm not sure if she even would remember being in half of them.... but alas I need to get a scanner...

Here's hoping you are all having a great week!

XxX ~ Rah Rah


Monday, July 8, 2013

The Cake is a lie... but my companion cube foot stool is.... er not?

Halleluiah IT'S FINALLY FREAKING FINISHED!!!!

 I've been working on this foot stool for jebus only knows how long.... but yesterday I finally finished it. You all have Lewy to thank for it, he came and plopped it down on my lap while I was watching How Clean Is Your House (rather than actually cleaning it like I should but shhhhh!), told me he was sick of looking at it half finished and that I had better finish it off before the end of the day.

Now lucky for my I only had a small bit left to go, otherwise I might have just broken down and cried right there on the lounge with images of lounge room rubbish tips blaring in the background....

And the best thing of all? You can make this thing yourself.... and no it doesnt have to be footstool size!


 To the left here we have the basic pattern you need... I did forget to mention that the whole big square needs to be in dark grey felt or material... but this is pretty much all you need to know. You can re-size this pattern any way you like... make a teeny tiny one... make a gigantic one... make whatever you want out of it!


Steps:
All my pretty pieces, and sewn the hearts and "legs"on
1. Cut out all your pieces. If you're using the pattern I have given you I suggest cutting out the whole big square first, then cutting out the other pieces from inside, will save you having to print the pattern out multiple times. I made my squares about 1.5 feet because after all I did make a foot rest and it would be hard to rest your achy feet on a pillbox.
2. First of all you need to sew the heart shape into the center of the circle shape. Do this until you run out of hearts and circles.
3. You need to attach the purple "legs" (for lack of a better word to call them at the moment" to the top, bottom, and each side of the circle. It should look like you have sewn the circle with the heart on it into the middle of a big plus sign, and do this until you run out of purple pieces and hearts, you should have 6 at the end one for eac
h face of the cube.
Sewing those corners together!

4. Now you can save time by doing this step now, or you can save it for later. If you have a sewing machine handy I suggest you do it now because it really will save some time! Take three pieces of the Corner shape and sew the long sides together, you will get a pyramid shape. Do this until you run out of corner shapes, you should end up with 8 sewn together pieces. Take the light grey rectang
le pieces and sew one end of the short edges together. Now set these pieces aside, because you wont need them until the very end.
5. Take your heart on a plus sign pieces, and you are going to sew them on to each face of the cube. I found that pinning them in place helped me center them better while I was stitching them on. (Let me tell you a sewing machine would have come in soooooo handy at this point, and this is why this darn thing took soooo long to finish!)
6. After you have stitched all the faces on you are ready to make them into a cube. I found that stitching them all together in a big cross shape was more effective than trying to sew them into shape one by one... so you do four long in a row, it doesnt matter which way the row goes, just make sure that your purple "legs" line up and touch each other. Then on the second square of the row you will sew one on the top and one on the bottom of the row so it looks like a cross shape. (not an "X" cross but more of a "t" cross)
My "cross" shape
7. Now stitch all the edges together around the two prongs of the cross to make the cube, this can be a bit tricky if you're using a machine, but its alright if you round the corners a little bit on the cube because they will be covere
d up at the end. Make sure you leave a spot open so you can flip the whole thing inside out (so the seams dont show) and so you can stuff it!
8. Stuff that thing until your hearts content... but please dont over stuff it, just remember it's a COMPANION CUBE not a COMPANION BALL. Then after you're finished stuffing it stitch closed the opening. I found it best to leave one of the corners open to do this step since they are going to be covered up at the end it doesnt really matter if you have a noticeable seam after you close it up.
9. Time to put those corners on! This bit was also a bit tricky, you dont
want to put them on too tight because they are supposed to protrude from the cube a little bit, stitch around 2.5 of the sides then take a small amount of stuffing and cram it into the corner just to make it a bit more "corner-ey". and continue to stitch around the last side, tie off the thread and viola you have just done a corner!
10. Last step! The rectangle pieces you have laying around will go over the purple "legs" and in between the two corner pieces you have done. Stitch around all of the edges you can put a little bit of stuffing in this bit as well if you like but thats up to you. Tie off all your edges and you're finished!


 Now you may have noticed in my "finished" picture up there my rectangles in the middle dont look as though they have seams in the middle. Don't worry I'm not that adapt at sewing by hand... me in all my smartness didnt cut enough of them in the first place, and therefore had to make do with one to cover the whole distance instead of two thats why it looks a little bit stretched... but still I'd rather have one that I made myself than one that I bought from the shops and paid a ridiculous amount of money for.... seriously it couldnt cost them any more to make than it did you right? So why can they charge $50 for it when it barely costs $15 to make? HUGE PRICE MARK UP!!!! and mine looks just as good anyways!

Now so no one sues, all rights to the companion cube are for whoever made the portal game... i dont take credit for coming up with the design or the name or any of that stuff... I do however take credit for the pattern.... because lets face it you would have to be a freaking rocket scientist to come up with that on your own!

Now if you will all excuse me, I'm gonna go and put my feet up, have a nice cup of tea and watch some more bad youtube videos that make me feel guilty for not cleaning or eating the right foods.... and then I'm going to go to work and deal with some screaming children while I can barely breath out my nose due to my allergies not being able to make up their minds if they want to act up or not....

Yes I am in my pajamas.... but it is not even 9am and I will probably stay in them until I have to change clothes for work..... Don't Judge ME!!!! By the way I freaking love my socks, they have pandas on the toes, and the colors are so bright they almost glow in the dark! I just wish they were a little bit warmer, because it was 2 degrees outside this morning.... 2! I'm bloody freezing here!!!

Now that I think about it actually I'm gonna have to hide my pretty and comphy new foot stool.... because lets face it, it's pretty and comphy and the mario mushroom foot stool that I made for Lewy ages ago has gone a bit... er, flat.
 
Which is pretty funny when you think about it because when I first made it it looked like 
-->
and Lewy squished it with his big man feet!

Wednesday, June 12, 2013

The Little Envy Doll!

That's right we have a doll!!!! Look at her there in all her glory, hand made by my using a pattern I made entirely by myself all HAND SEWN including her hair.

Yes I have a pattern for her, but no I cannot upload it. Not because I dont want to, but because I do not have a working scanner at the moment, and it was not previously scanned to my computer (sad face) it is sitting here in front of me in an envelope however...

This little girly I have decided to keep for my own daughter whenever she decides to grace us with her presence. But I have made two others, one is a blank state sitting in the bottom of my craft drawers just waiting for a face and some hair and clothes, the other was made into a ninja baby. This is a long story and no I wont go into it, but this one ended up going to one of my very bestest friends ever.
 They all start out blank, bald heads, no eyes. The face is just a sort of round ball with ears attached and a small bead or button sewn in the front for the nose. I do that bit before I start to stuff them. The head and body are all attached and stuffed, the arms and legs are attached separately using buttons so they move up and down like real arms and legs.
After everything is attached and secured I can start to add the details, like ankles and elbows, even a belly button. Because they are all babies (and I really suck at making mouths) I cut the tip off some old dummies or "passifiers"  and used some super glue to attach them to where the mouth would be, just under the nose. Next I drew a line with a pen for where the hair should go, and using a hair colored yarn, I doubled the length I wanted the hair to be, and started to sew around the line, by folding the yarn in half and stitching through the fold to attach the strand to the head. This takes a lot of time though and I don't recommend that you try and do it if you have no patience. I tied the hair up into either pony tails or pig tails just so I didnt have to do as much sewing. Next we put the eyes on the face, you can do any type of eyes you want, felt eyes, glass eyes, googly eyes, or even paint them on! You can make some doll clothes to fit if you like or buy some, or even use some old baby doll clothes.

The Mario Mushrooms Paradox

So this is the first of quite a few new blogs to come. See I was going through all my old pictures and found a whoooooole bunch of stuff I havent made blogs for yet... So I figured now would be a better time than any to create some new blogs, maybe get some new viewers in, and pretty much just show off my awesome talents....

Now when it comes to Super Mario, I'm a big Luigi fan. I dont think he gets enough credit... he does just as much work as Mario it's not his fault he usually only gets to come around and be "Player 2"...

But saying that aside, we're here to talk about the mushrooms! I made 4 of them, the mini,extra life, growth, and giant ones. They're really simple and easy to make, you dont even need a pattern for them!

Here's all you need: material/felt in respective colors, cream colored felt, white/orange felt for spots, and some black paint or a black fabric marker, a needle, some thread, and some stuffing. How much of each one you need will depend entirely on the size of the mushroom you are making, though (hence why I cant really give you a pattern)
Now to the right here is a picture of the mushrooms from the game. The four that I have made, Giant, Growth, Extra Life, and Mini. I can give you step by step instructions:
1. Grab something round like a bowl or a pot or a hoop and trace around it on your material or felt.
2. Cut it out, cut a smaller circle of the same color material or felt, this will be to cover the bottom after you stuff it.
3. Stitch around the edge of the big circle, when you have made it all the way around pull it tightly so it makes a sort of ball.
4. Stuff it as much as you want but be careful not to break your thread or  you will have to start over again.
5. After you have stuffed it as much as you want pull the thread tight and tie it off.
6. Using the smaller circle of the same color material or felt cover the gathered edges and stitch closed. This will give you a pretty finish.
7. Cut a circle from the cream material/felt and cut a strip long enough to go all the way around it.
8. Sew the ends of the strip together so you have a sort of tube.
9. Sew the tube to the circle so you have what looks like a cup, and flip it inside out so the seams dont show.
10. Attach the cup to the mushroom top by sewing the cup to the circle you stitched on earlier on the mushroom top to cover the gathered edges. Sew halfway around and then stuff before continuing to sew around.
11. Cut out some white/orange spots that would be proportionate to the size of the mushroom you are making and stitch them around the sides of the mushroom top. (You will probably need 5-6 of them)
12. Using the paint or fabric marker draw on two lines for the eyes on the cream colored material/felt.

Viola, you have your very own Super Mario Mushrooms. 

Lots of Loving,
*Rah~Rah*
 

Finally!!!


Yup, thats right! Rah Rah is back in business!! I'm very sorry it has taken me so long to get back into writing, but over the past month both my laptop and pc have died, and both me and Lewy have been sick as doggies...

But now I'm better, and while I havent gotten a replacement laptop just yet I HAVE gotten a new hard drive for my pc.... and believe it or not but when Lewy tried to put it in the old one just magically started working again. So I didnt lose any of my stuff!
So now I have all my pictures, wedding stuff, and my knitting patterns backed up on usbs and kindles XD


Now since my last post promised instructions on knitting a beanie, I will hold true to my promise.


Body of the Hat:
Cast on 84
k 8 rows in rib knit (k2, p2) * Repeat to end
Optional: Attach a different color to being new stripe
k27 rows in St. st.
Optional: Attach another color for final stripe
k13 rows in St. st, ending with a purled row
Note: If you want your hat to be longer or shorter, you can add or subtract rows here before you begin decreasing.
Decrease:
(k10, k2tog)* Repeat 7 times to end
Next Purl
(k9, k2tog)*
Purl
(k8, k2tog)*
Purl
(k7, k2tog)*
Purl
(k6, k2tog)*
Purl
(k5, k2tog)*
Purl
(k4, k2tog)*
Purl
(k3, k2tog)*
Purl
(k2, k2tog)*
Purl
(k1, k2tog)*
Purl
(k2tog)*
Finishing:
   Cut the yarn, leaving a long tail, and pull through remaining stiches, securing in first loop. Use the remaining tail to join the sides together. If you used multiple colors, use the tails from the color change to join that color's section together. Weave in any remaining ends.


Now just a side note that this beanie is made using straight needles. (I have a project in the works using circular needles but I need to finish it)

Because I have to work today, that means this blog will be sort of short and to the point. Tomorrow, however, I am off, and my only housework involves doing laundry in my brand new washing machine, and making my bed....

We have some interesting things to cover, some new patterns to put up, and lots of projects to finish so stay tuned! Also I'm sorry for the gifs, but I am super excited to be able to write on something with a real keyboard again!

Lots of Love,
*Rah~Rah*

Friday, May 17, 2013

All good things must come to an end....

Relax, I don't mean my blog!

Unfortunately my laptop has chosen this week to die... *Insert a bunch of crying here*
I have this kind of mood right now...
I love that laptop, not because it was the best thing ever, but because my Lewy bought it for me... It had all my wedding planning stuff on there, all my harry potter planning on there, all my music and my books for my kindle... a whole bunch of movies I hadnt had a chance to move to my portable hard drive yet, and the worst thing of all:

All the pictures of our house from the day we moved in until now.... I'm utterly devastated! Lewy said he thinks it may just be the motherboard that has messed up, it wasn't a very expensive laptop after all, and the thinks we may be able to salvage some of the stuff off the hard drive.... but at the moment Dr. Dad is having a look at it to see if he can fix it up for me.

Mr. & Mrs. Bears
Mrs. Bear with her tiara and veil
On a different note:
My Mr. & Mrs. bears are almost 100% finished!!!!! Mr. Bear is sporting a light blue knitted tie, a felt top hat and moustashe, and will soon be sporting "the old ball -n- chain" bit on one of his legs (providing it looks good) Mrs. Bear is sporting a white knitted veil, complete with a little jeweled tiara, fabric paint red lips, and a small bouquet of silver roses. All
they need now is their eyes and they will all be done!

I am still hoping to get up a pattern for my Mousy Beanie that I put up a while ago, but the pattern was on my laptop and I cannot for the life of me remember what it was exactly... So for now I beg you all to bear with me (no pun intended) while we work to salvage what we can off my poor departed laptop....

Now many of you have seen people writing about or heard them talking about something called a Bucket List.... I'll be a sheep and say I have one too, mine might be a little bit short, but after all it is only supposed to be things that are really important to you:

My Bucket List:
1. Learn to play the violin
2. Have a well trained dog, one that actually listens to me
3. Go on an exotic cruise somewhere like the Pacific Islands or Alaska
4. Marry the Man of my Dreams
5. Have a baby
6. Sometime before I die I want to hold a baby sloth and a baby chimpanzee
8. Own our own house
9. Get a job I actually love doing
10. Do a world traveling Holiday
11. Visit Japan
12. Learn to speak a different language fluently

As you can see I have already marked off two of the things on my bucket list! I think I am doing well for some one who is only 25... We are currently training Sade to shake her paw, she can already sit and stay, so we are on our way to marking that one off. Lewy has been trying to teach me Italian for the past 8 years... and I am getting it slowly... some of my words dont sound right because I am unable to roll my "R's", and today my mom sent me an early birthday present.... A BLUE VIOLIN!!!

I love it already!!! It's all set up and now the only thing I need to get for it is one of those electric tuners so I know if I'm playing the right note XD

She also got me three books on how to play it and I have endless amounts of youtube videos to watch on the matter but hopefully within the next year I can mark yet another thing off my list!

Now I am off for a while, hopefully will be able to update some of these patterns soon, wish me luck for getting stuff off my hard drive!!!

XxXx,
~Rah Rah


Thursday, March 14, 2013

Well then.....

So I've been a busy little bee lately!
Finished both my commissions ^_^ and now I'm a happy little girlie! Now until I get another one to do I'm making two of my very own little teds for my self (or future kids).
The blue and white stripey one is made with yarn that has no harsh dyes or chemicals in the yarn, and I have personally tried to rip him apart to make sure that no part of him could come lose by pulling (he's intended to go to a very special little boy soon!),and the face has been painted on as has the anchor on his chest, using nontoxic fabric paint so there is no risk of any buttons falling off and making their way into little tiny tummies.
Th black one has been made the same way and that one is going to my mom!

On a different note I have been awake since 5:30am ish today.... Lewy woke me up before he went to work, and I was bored out of my little mind waiting for the stores to open so I could go and do some shopping. I still got there early lolz and had to wait for almost half an hour for Aldi to open. Last night I had decided to make terriyaki chicken for dinner tonight, and I had to go out and get some white wine for the sauce... let me tell you, in my area NOTHING makes you feel more like a boozehound than waiting outside a liquor store for it to open at 9:30am. And because I'm all of 2 feet tall with a handbag thats almost as big as me, walking around said liquor store all wobbly while trying to knock things over with said huge bag does not help the drunk and disorderly stereotype..... Ah the joys of living here!
On the bright side I have gone out and done all my shopping, donated some clothes to a local charity shop, and made it home before 10:30am! Clever me!!!

Now for the rest of the week I plan on doing my housework and spending the rest of the days in bed watching movies while I knit my little heart out.... that is until Sunday when I have a bridesmaid dress fitting for my friend Rhiannon's wedding!!! It's less than a year away I'm so excited for them!! I'm looking forward to showing pictures of my own teds when they are done!

As always check out these awesome links:
Our Facebook Page!
My Ravelry Page!
My Deviant Art Page
and of course
A very special blog belonging to my cousin!!!

Wednesday, January 23, 2013

All Hail the Video Blog!!!


Lets see how this works! Don't mind my hair or clothes (It's rainy outside, I just woke up, and I'm still in my jammies XD) Hope you enjoy my first ever video blog!
As I said at the end leave any comments below (Please make them tasteful!)

Saturday, September 15, 2012

Easy Peasy Sunglasses Bag

So I really REALLY fell in love with the material I got from Spotlight for the back of my Country Kitchen Apron, and I've been trying to find a use for as much of it as possible.

When I carried my sunnies around with my in my hand bag they always ended up really dusty and needed to be cleaned almost every time I put them on (which isn't a good thing when you're driving!)

So there was a pretty long piece of the material left over, and if I folded it then it was just the right width to hold my sunglasses. So I sewed it together up the sides, and using a pink sheet of felt cut out the same size and sewed up the sides of that to make the inside of the bag.
Next I got a small length of pink ribbon and folded it in half tying the ends in knots so they wouldn't get lost inside the bag if you pulled one side too hard.
I flipped the material inside out so the stitches are on the inside, and slipped the felt inside the material (leave the stitches on the outside).
Stick the ribbon between the two layers all the way around the bag, and then fold over a small lip on the material side of the bag. Sew all the way around the bag leaving just enough of an opening for the ribbon to slide in and out of, leave a gap between the ribbon and stitch the gap closed.

Easy Peasy! Just make sure you don't catch your ribbon in your stitches, then slide your sunnies inside and pull the ribbon tight and VIOLA!!! You have your very own sunglasses bag!

Tuesday, September 11, 2012

Country Kitchen Flair!

So my favorite pair of jeans ended up getting a hole in the thighs. It couldn't be fixed with sewing or even a patch, and I didn't want to throw them away...

Bright idea? Turn them into my very own cooking apron!

So here's what you need:
  • old pair of jeans (not too ratty you need to have the legs in decent condition)
  • seam ripper
  • scissors
  • 1.5-2 meters of lace (optional)
  • 1 meter of thick strapping
  • sewing machine or needles
  • 1/2- 1 meter of your own chosen fabric
Now for the steps!

  1. Take the seam ripper and rip apart the legs of the old jeans. (you can also cut them apart if you are in a hurry or don't want to waste a lot of time trying to get them apart.)
  2. Cut the legs off the front of the jeans, I cut mine off just at the crotch because of the holes in the thighs.
  3. using the legs from either the front or the back you need to cut out the top part of the apron. I had a slight flair to my jeans so I cut out just under the knees and measured to the top of my chest. But you need to cut them long enough to cover from your chest to your waist.
  4. Decide on how you would like the top of the apron to look and cut the shape out accordingly. I chose a heart shaped top for mine you you can have a square top if you like.
  5. After cutting out the shape for the top, sew one side of the legs together, this will be the top of your apron.
  6. Open the legs, using pins attach it to the waist of the jeans. Using your sewing machine or by hand sewing, sew the top to the bottom of the jeans. Open it up and this will be the front of your apron.
  7. Pin your straps into place. (make sure they are long enough to tie around your neck and waist. Stitch these into place.
  8. Pin your lace around the front of the apron, it can be any color you like and any material you feel comfortable working with. Or if you choose you can NOT use lace at all
  9. Using your sewing machine or by hand sewing, attach the lace to the front of the apron.
  10. Cut out the shape of the apron from the material, if you have enough left over you can make a pocket to go on the front.
  11. If you make a pocket (or wish to put on an applique of any kind on the front) do it at this point.
  12. Sew the material to the jeans, right sides together. I didn't leave an opening around the edges because I left the zipper open to turn right side out. (If your jeans do not have a zipper or you have sewn it shut then you will need to leave an opening to turn the project right side out)
  13. Turn the project right side out and sew up any holes you have left.
  14. Iron over the seams to make the project flat. 
TADA!!! That's how it goes! Now you know how to make your very own apron using an old pair of jeans. This is also a great project for children, since its machine washable, you can use it for art projects, painting, or having the little ones help you out in the kitchen.

Monday, September 3, 2012

Update on Harry Potter Night!

Alright, lets just get it all out here on the table...

I've been a lazy LAZY little girl lately with my arts and craft projects...  at the moment I have about 4 things laying around half finished. BUT it's all OK.

Why? I can hear you asking yourself, let me tell you why. I've noticed it! Plain and simple truth... I'm slipping back into my old habits of starting stuff and never finishing it so now I'm doing something about it!

First thing's first, the Harry Potter night goodies. I have finished the Hufflepuff set of bags and scarves, and am 80% finished with the first Ravenclaw bag (the last of the sets that I need to make) And I've found that as long as I am doing other things while crafting I get a lot more done.

So I've been watching movies, and even the Australian version of Kath & Kim, and have almost finished this bag in record time!

Now if only things will stop interrupting me... either some one comes to visit us, the dogs have  been escaping our back yard because our next door neighbor is a moron who has no respect for his neighbors, or we have had to go out to see other people....

This week I have no plans to go anywhere, all I need to do is my housework and my crafts.

So with you all as my witnesses, I plan to at least have my Harry Potter sets finished and photographed by the end of this month!

Thursday, June 21, 2012

Introducing Sackboys!


So I know lately I've been working on my Harry Potter things, but I have decided to take a little break from all that (we don't want to get bored do we?).

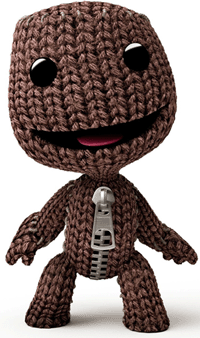
Here we have the marvelous Sackboy from the very fun playstation game Little Big Planet!
This one to the left is the doubled size version.  He's about 1.5 feet tall, and yes I know the photo is not the best, but I couldn't find big enough buttons for his eyes and now he looks creepy.
The photo on the right (the gray one with the play station remote) Is the size of the doll you will get if you follow the pattern given from HERE!  As much work and effort as I put into the double sized version I really do prefer the original one, he's just so much more adorable!

If you are feeling up to the task I will give you the pattern I used to make the big one.

Head
Cast on 24 stitches
purl one row
knit one row
(increase 2, increase 2, knit 2)  to end (gives you 40 stitches total)
purl one row
knit one row
purl one row
(increase 2, knit 2) to end (gives you 60 stitches total)
purl one row
knit one row
purl one row
(knit 2, increase 2, knit 2) to end (gives you 80 stitches total)
purl one row
knit one row
purl one row
(knit 2, increase 2, knit 4) to end (gives you 100 stitches total)
purl one row
knit one row
purl one row
(knit 4, increase 2, knit 4) to end (gives you 120 stitches total)
purl one row
knit one row
purl one row
(knit 4, increase 2, knit 6) to end (gives you 140 stitches total)
stocking stitch 7 rows
(knit 12, knit 2 together, knit 2 together, knit 12) to end (gives you 130 stitches total)
stocking stitch 7 rows (beginning and ending on purl rows)
(knit 12, knit 2 together, knit 2 together, knit 10) to end (gives you 120 stitches total)
stocking stitch 7 rows (beginning and ending on purl rows)
(knit 10, knit 2 together, knit 2 together, knit 10) to end (gives you 110 stitches total)
stocking stitch 7 rows (beginning and ending on purl rows)
(knit 10, knit 2 together, knit 2 together, knit 8) to end (gives you 100 stitches total)
stocking stitch 7 rows (beginning and ending on purl rows)
(knit 4, knit 2 together, knit 2 together, knit 2) to end (gives you 80 stitches total)
purl one row
knit one row
(purl 2 together, purl 2 together, purl 4) to end (gives you 60 stitches total)
stocking stitch 4 rows
(knit 2, knit 2 together, knit 2 together) to end (gives you 40 stitches total)
purl one row
knit 2 together to end (gives you 20 stitches total)
break the yarn off leaving a long tail, using a yarn needle thread yarn through remaining 20 stitches and pull tight, and use tail to stitch up head to neck. Stuff head.

Body
cast on 24 stitches
knit one row
purl one row
knit one row
purl one row
knit 2, (increase 2 x6 times), knit 6, (increase 2 x6 times), knit 4 (gives you 36 stitches total)
purl one row
knit one row
purl one row
knit 2, (increase 2, knit 2 x6 times) knit 6, (increase 2, knit 2 x6 times), knit 4 (gives you 48 stitches total)
purl one row
knit one row
purl one row
(knit 4, increase 2 x6 times), knit 10, (increase 2, knit 4 x6 times), knit 2 (gives you 60 stitches total)
stocking stitch 26 rows
(knit 4, knit 2 together, knit 2 together, knit 2) to end (gives you 48 stitches total)
purl one row
knit one row
purl one row
(knit 2, knit 2 together, knit 2 together, knit 2) to end (gives you 36 stitches total)
purl one row
knit one row
purl one row
(knit 2, knit 2 together, knit 2 together) to end (gives you 24 stitches total)
purl one row
knit one row
purl one row
(knit 4, knit 2 together, knit 2 together, knit 4) x2 times (gives you 20 stitches total)
cast off
Using the zipper start at the cast off end, sew around the zipper attaching it to either edge making sure that it covers the length of the body (overhang is fine at the top as you can tuck it into the head and you wont see it). Once the zipper is secured sew the body to the head it does not matter which way it faces. Open the zipper and stuff the body, when re-zipping the zipper add some glue to the teeth, this will make sure the zipper cannot be opened again (especially good if you are making this for a child)

Arms (make 2)
cast on 12 stitches
purl one row
increase into every stitch (gives you 24 stitches total)
stocking stitch 27 rows
cast on an extra 6 stitches at the beginning of the next two rows (gives you 36 stitches total)
cast off 6 stitches at the beginning of the next two rows (gives you 24 stitches total)
stocking stitch 4 rows

Fingers
knit 15 work these stitches only 
purl 6 work these stitches only
knit one row
purl one row
knit one row
break yarn, leaving a 60cm tail. Using a yarn needle thread the tail through the 6 stitches and pull tight, sew down edge of finger and continue knitting using the tail of yarn.
RING FINGER
knit 3 from left needle and work these  12 only
purl 6 and work these only

knit one row
purl one row
knit one row
Using a yarn needle thread the tail through the 6 stitches and pull tight, sew down edge of finger and continue knitting using the tail of yarn.
MIDDLE FINGER
knit 2 from left needle work these 12 only
purl 6 stitches work these only
knit one row
purl one row
knit one row
Using a yarn needle thread the tail through the 6 stitches and pull tight, sew down edge of finger and continue knitting using the tail of yarn.
INDEX FINGER
knit 4 from left needle
stocking stitch 4 rows
Using a yarn needle thread the tail through the 6 stitches and pull tight, sew down edge of finger and continue knitting using the tail of yarn. Using the tail, continue to sew the edge of the hand, stuff and close the opening, then sew to the edge of the body. Remember to make sure that you're thumb is pointing out!

Legs (make 2)
cast on 16 stitches
increase into every stitch (gives you 32 stitches total)
purl one row
knit one row
purl one row
(increase 2, knit 2) to end (gives you 48 stitches total)
stocking stitch 7 rows
(knit 2, knit 2 together, knit 2 together) to end (gives you 32 stitches total)
stocking stitch 23 rows
knit 2 together to end (gives you 16 stitches total)
break yarn, leaving a long tail. Using a yarn needle thread the tail through the stitches and pull tight, sew down edge of leg, stuff and close opening and sew to body

Taking a contrast color make some little X's around the bottom of the legs near the feet, around the wrists of the arms, and around the top of the head. Stitch a cute little mouth, and if you can find them use some really large buttons for the eyes. If you cant find large enough buttons you can always cut out circles of felt and use that!

Remember this is the pattern for the large doll. The pattern for the normal size doll can be found by clicking the link above!

Tuesday, June 5, 2012

Winter Project #1

Introducing the Harley Quinn Beanie!!!!

I got really bored and needed a break from some of my Harry Potter stuff, so I decided to take on a winter project. It is getting quite chilly down here in Aus afterall!

I decided to make a beanie for myself after my favorite character from Batman, Harley Quinn! 


I'm sure that there are a few patterns out there for this type of hat but I didn't use one this time. So here's my free pattern for it!

Step #1 measure around your head.
Step #2 divide that measurement in half (half of the hat will be red, the other half black)
Step #3 get your materials together.

I used two 50g balls each of Moda Vera Blissful of black and red, and one 50g ball of Moda Vera Blissful white, size 2 straight needles, size 4 straight needles, a yarn needle, and a pompom maker called twinkle bee.
The size of the needles will depend on the yarn you are using, but as a general note I would use one size smaller than the recommended size for the yarn, and then use the size recommended for the yarn.

Now the amount of stitches you cast on will depend on what type of yarn you are using, but just cast on enough so that when you stretch it out on the needles it is equal to the measurement of half your head. We will start with the smaller needles, and cast on your stitches, first with red. Continue in stocking stitch for about 6 rows, be sure to stop on the wrong side to change needles.

Change needles to the larger size and continue knitting for approximately 8 rows in stocking stitch.
After you have gotten this far we will start to decrease our stitches. I use the Knit 3 Knit 2 together method for decreasing my stitches. After each row of decreases continue to knit about 4 rows in stocking stitch before decreasing another row.

Once you have knitted to the desired length and have about 8 stitches remaining cut the yarn leaving a long tail, thread this tail through the remaining stitches and pull tight.

Now do the exact same thing with the Black yarn.

The next step is a bit tricky. You need to measure how far down to sew each arm of the beanie. To do this take one of the colors and place it on the side of your head, and pinch down until you have reached your scalp, remove the yarn from your head and move your fingers up approximately 1 inch. Sew the tail of yarn using the yarn needle to this point on half the beanie. Do the same with the other half.

Now using either color thread or remaining yarn sew both halves of the beanie together.

Now we make the pompoms. We will use the pompom maker from the Twinkle Bee set. If you cant get one of these then that is ok just use something small to wrap your yarn around, but be sure that you can tie some yarn around it before you have to cut it otherwise it will be very difficult!
I wrapped my yarn around this pompom maker exactly 100 times. On the large end of the maker.
Make sure when you tie your yarn around the pompom maker that it is very tight, and that you leave a long tail to use to sew the pompoms to the beanie.

On each of the arms of the beanie at the end you will need to sew the pompom using the yarn needle. I turned mine inside out, but with the yarn I used it was quite messy trying to flip it right side out once I had the pompom secured.

After the pompoms have been sewn on, try the hat on to make sure it fits! And Viola!!! You have your very own Harley Quinn beanie! Of course this doesn't have to be just a Harley Quinn beanie, you can use it as a jesters hat, add your own patterns to the knitting, add more arms, use different colors, whatever you like!


The Long Awaited Robes!!!

(Just a disclaimer: This is not my video this is not me! I do not take credit for this work. I do take credit for the Slytherin robe which I made by following the instructions in this video that I found on Youtube)

So now as promised!!!! Here is the video I used to make my Slytherin Cloak for my Harry Potter night costume. Of course in the video they made a Gryffindor robe, the only difference is that instead of using burgundy I used green material.
In the video they used king size sheets, now I don't know about where you guys come from but here in Australia sheet sets do not come that cheap (especially king size ones!), so to save myself some money I just went out to a local craft shop and got a few meters of material, I used silk because I like the way it drapes and feels when you wear it, but you can really use any sort of material you like. You don't even have to make a Hogwarts Robe out of it, you can literally make any sort of robes you like following the simple instructions on the video!
One other little thing I did differently from the video is that I hand sewed the entire robe, I liked to be able to see my stitches and it really gives it that home made look, but you can use a sewing machine it will be a lot faster AND probably make it look a bit more professional.

The photo to the left is my finished product! You can tell from the video that I used different materials they are pretty shiny in the picture, but thats alright, this is a matter of personal tastes and you can use whatever you like!
Just remember when you are measuring your material you want to add a few inches to each measurement, especially if you are using a sewing machine because the foot will take up some of the length. The length of the whole robe is entirely personal. I made mine just long enough to reach the floor, but if you are short like me then there isn't really much you can do about things being too long. And the arms need to come over your hands, i added about 4 extra inches to my measurements so the robe wouldn't be too short when I raised my arms, and remember that they are supposed to be big, so remember to cut them that way! I cut mine like old witches robes where the sleeves kind of fan out, but I only made it subtle.
There are some little embellishments that I chose to use as well on my cloak. I added the hood just like from the video, but I also added a house patch and a clasp to close the robe.


To the left is the clasp I used. Just a simple rope clasp that I got from Spotlight for pretty cheap. Since I was hand sewing everything I thought it would be a bit easier for me to sew each side of the clasp onto a small square of black felt. That way I could just sew around the square instead of trying to make sure I caught all of the details and this way it also gives the clasp a bit more of a larger area, making sure that it holds tight and wont rip your material as easily, this is a good thing to try and do if you have a really long robe just in case you step on it. To the right is my Slytherin House Crest Patch. This one I bought off ebay for about $4 and just ironed it onto the material, but you could always make your own if you choose, there are a few tutorials on youtube that are good, but I wanted to save some time in finishing it.

So there you have it! The long awaited House Robes Blog is finally up and going places! I hope you enjoyed it!!!

Wednesday, May 9, 2012

Le Hufflepuff Bags!


So once again I present to you the Hufflepuff Bag Set (free pattern by clicking here)! I'm still working on the scarves but they will be up soon.
Now you may notice that this set of bags differs a bit from the others, this is because I used two different types of yarn. The black yarn is just a normal 12 ply where the yellow is the very soft baby type yarn used to make blankets or baby clothing....
This made it difficult to do the fringe at the bottom, as every time I tried to pull a bit of yellow yarn through I ended up pulling the fluff off of it and was left with a few threads, so the fringe for the hufflepuff bag is a solid color, and the fringe on the scarves will be the same.  Lately I have also been looking around for some decoration ideas. I have found quite a few! There's the Hogwarts Crest that I have put on the top of my invitational letters, and used GIMP2 to turn it a nice green color to match the ink in the movies. There's the Potion Bottle Labels that I plan on using for my lollies and drink bottles, which will be easily done. I plan on getting a few of the glass water bottles from a cheapy shop and placing a label on it for drinks, and getting a few of the glass jars for the lollies.
There are the Butter beer labels which you can print off for free, and I will also be putting those on some of the water bottles, but I plan on getting some glass beer mugs and placing a label on each one of those as well, as a party favor for my guests.


I do also have my slytherin cloak finished entirely now, but as I am home by myself at the moment and would need someone to model it for me.... well it will just have to wait until some one else gets home, because I highly doubt that any one wants to see it on my puppy! There will be an awesome step by step video for the next blog so stay tuned!