It really is frightful....
It's supposed to be autumn down here and its as cold as winter normally is! This week I have done the impossible.... I finally made a beanie to fit myself!
It even has some ears!!!!This is the first one I've made that has actually fit my fat head, and it only took me two days to do it! I dont have the time to put the pattern up now because I'm only on my lunch break from work... but dont worry it will be up soon!
My cousin finally got her package in the mail, and I''m super excited to hear what she thinks of it once she gets back home to see it!!!
Other than that we have been busy little bees lately, we got tiles for our kitchen, we had a bbq and our friend Aaron got himself a new ute, and this week I have been pulling double shifts at the pool to cover some one who has been sick.... speaking of sick, I'm starting to feel that way myself, jumping in and out of the water 8 hours a day and being cold outside does not a well person make... I've been waking up feeling like I've swallowed razor blades and sand paper =(
So until the next time I can get on to update my bloggie I'll leave you guys with a "Hope you are all well, and enjoying the day!"
XxX ~Rah Rah
A blog about different crafts, free patterns, instructions, and creations! I try my best to make my crafts as easy as possible, sometimes I have trouble with them, and I'm sure if I'm the one making them and I'm having trouble that others will have trouble with them as well. So here I will write about the different things I make... all the troubles I had, the parts I found easiest, things I had to improvise with... and also offer my patterns free to you!
Search This Blog
Showing posts with label Hat. Show all posts
Wednesday, April 24, 2013
Friday, February 8, 2013
The Little Punkin' set!
Itty Bitty Baby Booties! (newborn size)
What you need: 1 pair of knitting needles (the size recommended for your yarn, I used 8ply yarn and size 4mm needles), 1 ball of yarn (or different colors if you wish to make stripy shoes), 1 yarn needle or tapestry needle.Instructions:
- Cast on 38 stitches
- Knit 10 rows (sole of the shoe)
- Knit 16 stitches, slip 1 stitch, knit 1 stitch, pass slipped stitch over knitted stitch, knit 2 stitches, knit 2 together, knit 16 stitches
- Purl 15 stitches, slip 1 stitch, purl 1 stitch, pass slipped stitch over purled stitch, purl 2 stitches, purl 2 together, purl 15 stitches
- Knit 14 stitches, slip 1 stitch, knit 1 stitch, pass slipped stitch over knitted stitch, knit 2 stitches, knit 2 together, knit 14 stitches
- Purl 13 stitches, slip 1 stitch, purl 1 stitch, pass slipped stitch over purled stitch, purl 2 stitches, purl 2 together, purl 13 stitches
- Knit 12 stitches, slip 1 stitch, knit 1 stitch, pass slipped stitch over knitted stitch, knit 2 stitches, knit 2 together, knit 12 stitches
- Purl 11 stitches, slip 1 stitch, purl 1 stitch, pass slipped stitch over purled stitch, purl 2 stitches, purl 2 together, purl 11 stitches
- Knit 10 stitches, slip 1 stitch, knit 1 stitch, pass slipped stitch over knitted stitch, knit 2 stitches, knit 2 together, knit 10 stitches.
- purl 1 row
- knit 2 stitches, yarn over twice, knit 3 stitches, yarn over twice, knit 3 stitches, yarn over twice, knit 3 stitches, yarn over twice, knit 2 stitches, yarn over twice, knit 3 stitches, yarn over twice, knit 3 stitches, yarn over twice, knit 3 stitches, yarn over twice, knit 2 stitches.
- purl 2 stitches, drop both yarn over stitches, purl 3 stitches, drop both yarn over stitches, purl 3 stitches, drop both yarn over stitches, purl 3 stitches, drop both yarn over stitches, purl 2 stitches, drop both yarn over stitches, purl 3 stitches, drop both yarn over stitches, purl 3 stitches, drop both yarn over stitches, purl 3 stitches, drop both yarn over stitches, purl 2 stitches.
- knit 1 row
- purl 1 row
- work 13 rows in ribbing (knit 2 stitches, purl 2 stitches)
- loosely cast off
- sew up edge
- flip down cuff
- using a ribbon or some yarn thread through the eyelets and tie into a bow
- put on a baby and admire your work!
Tuesday, June 5, 2012
Winter Project #1
I got really bored and needed a break from some of my Harry Potter stuff, so I decided to take on a winter project. It is getting quite chilly down here in Aus afterall!
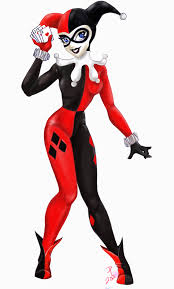
I decided to make a beanie for myself after my favorite character from Batman, Harley Quinn!
I'm sure that there are a few patterns out there for this type of hat but I didn't use one this time. So here's my free pattern for it!
Step #2 divide that measurement in half (half of the hat will be red, the other half black)
Step #3 get your materials together.
I used two 50g balls each of Moda Vera Blissful of black and red, and one 50g ball of Moda Vera Blissful white, size 2 straight needles, size 4 straight needles, a yarn needle, and a pompom maker called twinkle bee.
The size of the needles will depend on the yarn you are using, but as a general note I would use one size smaller than the recommended size for the yarn, and then use the size recommended for the yarn.
Now the amount of stitches you cast on will depend on what type of yarn you are using, but just cast on enough so that when you stretch it out on the needles it is equal to the measurement of half your head. We will start with the smaller needles, and cast on your stitches, first with red. Continue in stocking stitch for about 6 rows, be sure to stop on the wrong side to change needles.
Change needles to the larger size and continue knitting for approximately 8 rows in stocking stitch.
After you have gotten this far we will start to decrease our stitches. I use the Knit 3 Knit 2 together method for decreasing my stitches. After each row of decreases continue to knit about 4 rows in stocking stitch before decreasing another row.
Once you have knitted to the desired length and have about 8 stitches remaining cut the yarn leaving a long tail, thread this tail through the remaining stitches and pull tight.
Now do the exact same thing with the Black yarn.
The next step is a bit tricky. You need to measure how far down to sew each arm of the beanie. To do this take one of the colors and place it on the side of your head, and pinch down until you have reached your scalp, remove the yarn from your head and move your fingers up approximately 1 inch. Sew the tail of yarn using the yarn needle to this point on half the beanie. Do the same with the other half.
Now using either color thread or remaining yarn sew both halves of the beanie together.
Now we make the pompoms. We will use the pompom maker from the Twinkle Bee set. If you cant get one of these then that is ok just use something small to wrap your yarn around, but be sure that you can tie some yarn around it before you have to cut it otherwise it will be very difficult!
I wrapped my yarn around this pompom maker exactly 100 times. On the large end of the maker.
Make sure when you tie your yarn around the pompom maker that it is very tight, and that you leave a long tail to use to sew the pompoms to the beanie.
On each of the arms of the beanie at the end you will need to sew the pompom using the yarn needle. I turned mine inside out, but with the yarn I used it was quite messy trying to flip it right side out once I had the pompom secured.
After the pompoms have been sewn on, try the hat on to make sure it fits! And Viola!!! You have your very own Harley Quinn beanie! Of course this doesn't have to be just a Harley Quinn beanie, you can use it as a jesters hat, add your own patterns to the knitting, add more arms, use different colors, whatever you like!
Tuesday, August 9, 2011
Nothing better than a birthday!
Alright So I know this has nothing to do with Harry Potter, but I still think its worth an honorable mention. Sunday I am attending a very special little girl's FIRST birthday ever, and I have decided that the whole "eat it or wear it" saying needs to be put into motion.Since most little ones feel the need to grab handfuls of everything and shove it straight into their mouths (which we dont want her doing to the cake) I have decided to make something she can wear that will look almost as good!
We are talking about the exclusive CAKE HAT!!!! It's a big slice of chocolate cake, with a big dollop of vanilla ice cream melting and oozing down the sides, with a great big #1 candle on top. Mind you it will all be made of felt so she can chew on it 'till her little hearts content and no one will be upset that there is handfuls of real cake missing and smeared all over her face and clothes....
There will be a photo put up as soon as it's finished, and yes I am still on Hiatus from the Harry Potter themed objects until we get settled in and unpacked lolz, this is just being made from some bits and pieces I had laying around.
Subscribe to:
Posts (Atom)

