Search This Blog

Monday, April 30, 2012

Invitations!!!!

So I've went out and purchased all the things I will need for my Oh So Lovely invites to the Harry Potter Extravaganza we plan on having!

Everything is now ready (invitation wise), however, Did you know that overhead transparencies are sooooo expensive?! I wanted to get a few sheets to print the actual invites on and then put the transparency over some lovely paper, but for a pack of only 10 sheets they wanted to charge me $50! BLASPHEMY!!!!

So now I have had to compromise and have decided to still use my lovely paper, and then antique some regular printer paper with the invitation on it. I'm gonna crinkle it up nice and soft and then tea stain it so it looks really old, and use some pretty brass scrap-booking tacks to hold it in place over the nice paper.

And now the only problem is, that still we have no kitchen to cook the feast in.... (The menu for which has been compiled and a shopping list has been made) AND the printer is broken..... so we went out looking and found that we can get a new printer with WiFi for almost as much as the freaking overhead transparencies would have cost me!

Also on a brighter note I would like to say that we finally got our little pup home with us, she's still a bit sad because now she has no one to play with but we plan on getting another puppy eventually.

Monday, April 16, 2012

As promised!


BAGS!!!!!

and 

Scarves!!!!!

As I've said before here is pretty much what I've done since my big break. To the left we have our Gryffindor bags and scarves, and to the right we have our Slytherin set. I've decided to make two of each bag and a total of eight scarves, four in single blocks and four in stripes. These have taken aaaaages to make, but they have been totally worth it! My only problem is that when I went out and got all my yarn to make the bags I didnt notice that the sizes I got were all different, but that's alright it just means everything will be different sizes.
So here we have our scarves, made from the same yarn as the bags. Four were made of each style. The pattern for these scarves is simple, I just did a search of what styles of scarves there were and made miniature versions. They measure approximately 8 inches long and have a fringe on the bottom just like a normal scarf. There is a problem with rolling up on the edges of these, but if you use a yarn that is iron-able it is easily fixed.  There is a pattern for some double knitted book scarves that gave me the idea for this which can be found here and its free! That's always good to have.

Golden Snitch Key chain


I decided to try and make a few golden snitch key chains, only because knitting them really was making my fingers bleed. It's ok though not everything needs to be knitted, there are more than a few ways to do what you like! I went to my local craft store in the jewelery section for this little number, and let me tell you it was a little hard to find what I wanted. I ended up having to go several times and to a few different craft stores to find all the parts I needed, you wouldn't think it would be so hard... Now I ended up using some end posts which were pretty long, some silver wing charms, phone charm lanyards (the black thing in the photo) and some small golden balls. I was looking for some plain golden beads, but instead I found these very ornate balls with holes on each side just the right size for the end posts to go through. Using a pair of wire curlers I threaded the end post through the wings and the ball, curled the end around making it nice and tight and then attached the charm lanyard to the curl. To top it off it will be presented in a small silver gossamer drawstring bag, with a small note reading the line from the last movie where Harry Potter receives the golden snitch in Dumbledoor's will reading.

Coming up next: Huffellpuff Bags and Scarves!


Saturday, April 14, 2012

Back In Business!!!!

So as of today I have full internet access as well as a fully functioning computer ^_^ its gonna take me a while to get back into the swing of things though I've been forced to use my phone for so freaking long I've almost forgotten how to use a proper keyboard!

Now I haven't slacked off, don't you worry! I've finished both the Slytherin and Gryffindor house bags and the sets of scarves, as well as came up with some really cute golden snitch key rings. (Pictures and instructions will follow at a later date.)

I am currently starting work on the Huffelpuff bags and scarves. The invitations are ready and awaiting a chosen date, all of the decorations are ready to be put into place, the menu is set, and now all we need to do is finish unpacking our new house, and get our kitchen sorted and we will be on a roll!

Sunday, January 8, 2012

Almost that time!

Well its almost time for me to come back, well back to blogging again lolz. I know I've kept you all waiting for a while, but you have to understand.... we have been looking for a house and have had to move out of where we were staying and into the inlaws house, I havent been able to stay on the computer long since we have had things to do.... BUT all thats about to change!!!! Our settlement is on the 16th of January and we only have a small bit of work to do before we can move all our stuff in. I'm really excited I cant wait to start painting and furnishing the place!!!!


I have still been a busy bee dont you worry, I've finished the Gryffindor and Slytherin bags, as well as the book scarves, but most of my other stuff has been packed away. I did however come up with a new plan for making the magic wands, with a light up tip thanks to my awesome fiance ^_^ and I made my very own Slytherin House Robes, I had to order the patches off e-bay but they were very cheap. After the patch arrives in the mail I will iron it onto the robes and they will be 100% finished. I will be sure to make a very HUGE blog post about everything I have made while I've been away.

My little sister in law has just finished making some home made ice cream, and we are all about to partake in the eating of it! I will not forget to write again.

Ta-ta for now!

Wednesday, August 17, 2011

The First bag...

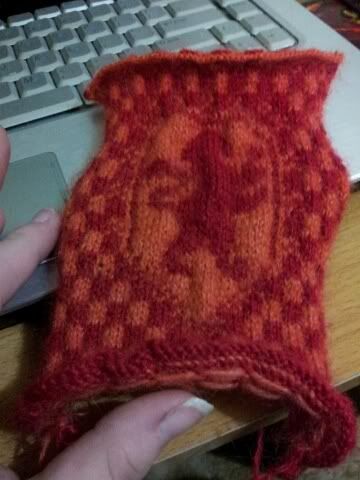
So here we go! Now I got the pattern for these bags at This Site, and in the instructions it says to knit it "in the round"... now since I'm only a beginner I dont really know how to do that so I have cheated a little bit and decided that I am going to knit two different sections and sew them together.

This is a quite difficult thing to do (unless you're an expert knitter), I had to start over about 4 times which is why it has taken me so long to put up a blog about it! I am VERY happy with the end result even though it took me a while and its not entirely finished, this part on its own could be used by its self, for a wall hanging or a patch on a jacket, maybe even sewn on to a pillow for a Harry Potter themed throw!
For this one I use some angora wool not sure what size it is, and size 11 knitting needles. There is more to this project though, I still have the other half of this bag to do and the other three houses as well! But now that I know what I'm doing it will be easy peasy! So hopefully this will get you all in the mood to try it out, and attempt it at least its a really fun project to do, especially on a rainy day like today was!

Next on the list: finish off the bags! Make more snitches, mice, and cats, and figure out a way to make some magic wands!

Wednesday, August 10, 2011

Let there be cake!

What could be more appetizing than a nice gooey slice of chocolate cake? Nothing thats right!
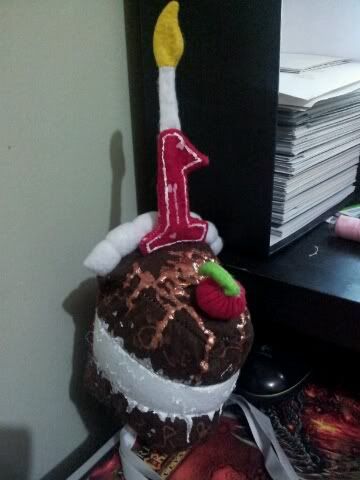
This little beauty was made from felt, hand stitched and fabric paint gooey-ness...

What to do? This one is so simple you dont even need a pattern, cut out two triangles thats the size of the slice you would like, brown for chocolate cake, white for vanilla, pink for strawberry.... or go all out and make a multicolored rainbow cake!
Next, cut a few strips for the layers of your cake long enough to go around the two large edges of your triangles, and then cut a few strips of the "cream" to go between the layers of cake. Sew these strips in a cake/cream pattern until you run out of cake layers.
Next cut an icing layer that is as wide as the short edge of your triangles, and as long as all of your layers once they have been sewn together, this will be the back of your cake icing.
Cut out a number, or numbers from your choice of colors, a strip of white, and a flame shape from some yellow, this will be your candle. The cherry is optional, but its just a red circle and a green strip of felt.
You will also need some ribbons so you can wear it as a hat, or if you just want it as a toy forget the ribbon.. Now for the interesting part: the assembly.
1. Take the ribbons, if you are using it, and sew one end of it to each long edge of the triangle you will put on the bottom of the cake.
2. Make the candle: Sew the flame together and turn it inside out, sew the white strip together and attach the flame to it this will be the candle wick, place the wick and flame inside the number and sew the number together leaving an opening at the bottom to flip it right side out, leave this open.
3. Cut a small opening in the top of the cake and place the open end of the candle into the opening. Sew this shut from the underside of the cake top. 
4. Take the layers and the top part of the cake, sew the layers around the two long edges of the triangle, this will make up your slice.
5. Take the back of the slice and sew across the top of the cake, and down each side of the layers, this will make up the icing.
6. Sew the bottom triangle on, the same way you did the top of the cake, but leave the back edge open so you can flip it right side out.
7. After flipping it right side out, make sure all your points are pointy and then stuff it with craft stuffing until you're hearts content. Then sew up the bottom back edge.
8. Add your details, this means using the fabric paint which will make your cream look a little more creamier, or look like chocolate/caramel sauce drizzled over the top.

To make the cherry, single stitch around the edge of the red circle and pull semi-tight. Add some stuffing and pull the thread tight, add the green strip of felt to the opening and sew shut, then tack it to the top of the cake.

And there you have it, your own personal slice of cake, now you really can have your cake and eat it to!

Tuesday, August 9, 2011

Nothing better than a birthday!

Alright So I know this has nothing to do with Harry Potter, but I still think its worth an honorable mention. Sunday I am attending a very special little girl's FIRST birthday ever, and I have decided that the whole "eat it or wear it" saying needs to be put into motion.
Since most little ones feel the need to grab handfuls of everything and shove it straight into their mouths (which we dont want her doing to the cake) I have decided to make something she can wear that will look almost as good!
We are talking about the exclusive CAKE HAT!!!! It's a big slice of chocolate cake, with a big dollop of vanilla ice cream melting and oozing down the sides, with a great big #1 candle on top. Mind you it will all be made of felt so she can chew on it 'till her little hearts content and no one will be upset that there is handfuls of real cake missing and smeared all over her face and clothes....
There will be a photo put up as soon as it's finished, and yes I am still on Hiatus from the Harry Potter themed objects until we get settled in and unpacked lolz, this is just being made from some bits and pieces I had laying around.