Search This Blog

Friday, July 27, 2012

All the Little Branches


So I know normally I'm putting up photos of everything I do, weather it's finished or not, but this time I have decided to take on a rather different type of project.

I've decided to try and do a MASSIVE family tree with both sides of my own family, all the in-laws and both sides of their families, for as far back as I can possibly go! It's a very big project that I'm working on, but to make it even bigger I have refused to use anything other than Google and my own family members to complete it, these ancestry websites are ridiculously overpriced!!!

At the moment my family tree is waiting on several branches that my mother is working on, lots of missing birthdays and partners names, and I'm stuck at my own great grandparents... Google is being MOST uncooperative in this matter, I cant find a single article on either set of my great grandparents.... Its really hard to find information out about people who were from another country =(

I'm using a simple software called MyHeritage which I found on Google for free, it's nothing fancy pants, but it does help you organize all your information. I can add photos and tag people's faces, birth dates and places, death dates and places, marriage dates and places, where people used to work, I can even link to articles I find online about them! It has a global map, and anywhere you have tagged an important event birth/death/marriage/workplace it will place a pin in the map. So far I only have a few pins, but with my limited knowledge I think I have done very well!

When I have gathered as much information as I can this software also allows you to upload the family tree to a website to share with the world, you can even order a nice wall hanging with the entire tree on it! I think that a lot of my family members would enjoy seeing the finished project, knowing where you come from is important to me.  I think it's comforting in a way to know your own background, I feel like I have a bit of amnesia when people ask me about my Italian background and all I can do is stare at them like an idiot because I have no idea about it...
I know a lot of people out there would wonder why do it at all, why even bother trying to find out things that happened in the past... I love the mystery! I would love to be working my way through my own history and , find out I'm a descendant of some one really famous, or even find out something like my family fled the country as criminals would be interesting to me. It would give some really good stories to tell people... "Did you know way back in the 1600's my relative was in the Salem Witch Trials?" "Did you know that I'm very distantly related to Vincent Van Gough?"  How cool would it be to tell people things like that and then be able to show them proof?!

All in all this task is just for me, to give myself a little bit of a history lesson. But, I know that there are many more people in my own family that would love to see it, to see how the branches are twined together, to know the places we all come from... even to see who's in-laws came from where!

At this moment we are going strong with 145 people, from 48 different families. My Uncle has a bunch of info to give me, and my mother has scrounged up a few different people I can talk to over facebook who have taken on smaller versions of my task previously... I can't wait to see how big this thing will be!!!

Saturday, July 14, 2012

No Rest for the Weary...

So here we are again.... the end of yet another horrid week involving high temperatures, chest infections, and delirium...
I've even been way to sick to even finish my current project.... however before I was infected with what feels like the plague, I managed to make my own GIR doll from Invader Zim! One thing to be happy about I guess.

Now I know its not the best in the world, but it is pretty darn close if  I do say so myself, completely 100% my own pattern, which as soon as we get a working scanner it will be uploaded for free! There were a few kinks to work out with the pattern but not to worry they have all been fixed up for my dear sweet viewers.
I have also finished Lewy's balaclava! However once I put the lining in it was a bit tight, but after a few times of wearing it it should stretch out some.

My current project is my own footstool companion cube. But since I've been sick this is as far as I've gotten with it, a pile of squares and love hearts lolz. It will get there though, then I'm bound and determined not to get distracted from finishing my Harry Potter bags.... I only have the Hufflepuff scarves and the Ravenclaw set to finish.

Now for a little while more I'm going to rest and recuperate  Hopefully I'm feeling up to finishing these projects soon!

Wednesday, June 27, 2012

Cooking up a nice new book!

So I've noticed lately that there are A LOT of cookbooks around... but they are all full of stuff that I dont really want to cook.
It sucks that you have to pay $20 for this book when there are only one or two recipes you will actually use in them. So I have decided to make my own little book to fill with all my favorite recipes, and my family recipes, and all kinds of yummy stuff!
I know it would be just as simple to go out and get a ready made note book, but where's the fun in that? This way you can make your own hard cover book, with any type of cover you want! I found this awesome tutorial on youtube with step by step instructions (the videos!)
This lady is freaking awesome! She makes it really simple to make, she explains everything really well and shows you each step as she does it.
Now here's my very own hard cover journal!!!:
It took me only a day to make (and yes I realize that my cover's words are upside down but we aren't focusing on that right now) It's a little bit messy, but I think it's totally worth it in the end, you end up with a beautiful book you can tell everyone you made yourself, and something you can match to your very own needs! If you want a cook book you can make a cook book, if you want a journal you can make it a journal! I really hope you like it!

Thursday, June 21, 2012

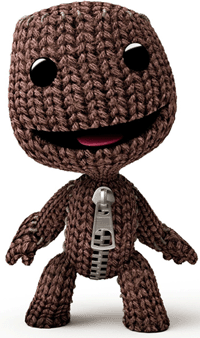
Introducing Sackboys!


So I know lately I've been working on my Harry Potter things, but I have decided to take a little break from all that (we don't want to get bored do we?).

Here we have the marvelous Sackboy from the very fun playstation game Little Big Planet!
This one to the left is the doubled size version.  He's about 1.5 feet tall, and yes I know the photo is not the best, but I couldn't find big enough buttons for his eyes and now he looks creepy.
The photo on the right (the gray one with the play station remote) Is the size of the doll you will get if you follow the pattern given from HERE!  As much work and effort as I put into the double sized version I really do prefer the original one, he's just so much more adorable!

If you are feeling up to the task I will give you the pattern I used to make the big one.

Head
Cast on 24 stitches
purl one row
knit one row
(increase 2, increase 2, knit 2)  to end (gives you 40 stitches total)
purl one row
knit one row
purl one row
(increase 2, knit 2) to end (gives you 60 stitches total)
purl one row
knit one row
purl one row
(knit 2, increase 2, knit 2) to end (gives you 80 stitches total)
purl one row
knit one row
purl one row
(knit 2, increase 2, knit 4) to end (gives you 100 stitches total)
purl one row
knit one row
purl one row
(knit 4, increase 2, knit 4) to end (gives you 120 stitches total)
purl one row
knit one row
purl one row
(knit 4, increase 2, knit 6) to end (gives you 140 stitches total)
stocking stitch 7 rows
(knit 12, knit 2 together, knit 2 together, knit 12) to end (gives you 130 stitches total)
stocking stitch 7 rows (beginning and ending on purl rows)
(knit 12, knit 2 together, knit 2 together, knit 10) to end (gives you 120 stitches total)
stocking stitch 7 rows (beginning and ending on purl rows)
(knit 10, knit 2 together, knit 2 together, knit 10) to end (gives you 110 stitches total)
stocking stitch 7 rows (beginning and ending on purl rows)
(knit 10, knit 2 together, knit 2 together, knit 8) to end (gives you 100 stitches total)
stocking stitch 7 rows (beginning and ending on purl rows)
(knit 4, knit 2 together, knit 2 together, knit 2) to end (gives you 80 stitches total)
purl one row
knit one row
(purl 2 together, purl 2 together, purl 4) to end (gives you 60 stitches total)
stocking stitch 4 rows
(knit 2, knit 2 together, knit 2 together) to end (gives you 40 stitches total)
purl one row
knit 2 together to end (gives you 20 stitches total)
break the yarn off leaving a long tail, using a yarn needle thread yarn through remaining 20 stitches and pull tight, and use tail to stitch up head to neck. Stuff head.

Body
cast on 24 stitches
knit one row
purl one row
knit one row
purl one row
knit 2, (increase 2 x6 times), knit 6, (increase 2 x6 times), knit 4 (gives you 36 stitches total)
purl one row
knit one row
purl one row
knit 2, (increase 2, knit 2 x6 times) knit 6, (increase 2, knit 2 x6 times), knit 4 (gives you 48 stitches total)
purl one row
knit one row
purl one row
(knit 4, increase 2 x6 times), knit 10, (increase 2, knit 4 x6 times), knit 2 (gives you 60 stitches total)
stocking stitch 26 rows
(knit 4, knit 2 together, knit 2 together, knit 2) to end (gives you 48 stitches total)
purl one row
knit one row
purl one row
(knit 2, knit 2 together, knit 2 together, knit 2) to end (gives you 36 stitches total)
purl one row
knit one row
purl one row
(knit 2, knit 2 together, knit 2 together) to end (gives you 24 stitches total)
purl one row
knit one row
purl one row
(knit 4, knit 2 together, knit 2 together, knit 4) x2 times (gives you 20 stitches total)
cast off
Using the zipper start at the cast off end, sew around the zipper attaching it to either edge making sure that it covers the length of the body (overhang is fine at the top as you can tuck it into the head and you wont see it). Once the zipper is secured sew the body to the head it does not matter which way it faces. Open the zipper and stuff the body, when re-zipping the zipper add some glue to the teeth, this will make sure the zipper cannot be opened again (especially good if you are making this for a child)

Arms (make 2)
cast on 12 stitches
purl one row
increase into every stitch (gives you 24 stitches total)
stocking stitch 27 rows
cast on an extra 6 stitches at the beginning of the next two rows (gives you 36 stitches total)
cast off 6 stitches at the beginning of the next two rows (gives you 24 stitches total)
stocking stitch 4 rows

Fingers
knit 15 work these stitches only 
purl 6 work these stitches only
knit one row
purl one row
knit one row
break yarn, leaving a 60cm tail. Using a yarn needle thread the tail through the 6 stitches and pull tight, sew down edge of finger and continue knitting using the tail of yarn.
RING FINGER
knit 3 from left needle and work these  12 only
purl 6 and work these only

knit one row
purl one row
knit one row
Using a yarn needle thread the tail through the 6 stitches and pull tight, sew down edge of finger and continue knitting using the tail of yarn.
MIDDLE FINGER
knit 2 from left needle work these 12 only
purl 6 stitches work these only
knit one row
purl one row
knit one row
Using a yarn needle thread the tail through the 6 stitches and pull tight, sew down edge of finger and continue knitting using the tail of yarn.
INDEX FINGER
knit 4 from left needle
stocking stitch 4 rows
Using a yarn needle thread the tail through the 6 stitches and pull tight, sew down edge of finger and continue knitting using the tail of yarn. Using the tail, continue to sew the edge of the hand, stuff and close the opening, then sew to the edge of the body. Remember to make sure that you're thumb is pointing out!

Legs (make 2)
cast on 16 stitches
increase into every stitch (gives you 32 stitches total)
purl one row
knit one row
purl one row
(increase 2, knit 2) to end (gives you 48 stitches total)
stocking stitch 7 rows
(knit 2, knit 2 together, knit 2 together) to end (gives you 32 stitches total)
stocking stitch 23 rows
knit 2 together to end (gives you 16 stitches total)
break yarn, leaving a long tail. Using a yarn needle thread the tail through the stitches and pull tight, sew down edge of leg, stuff and close opening and sew to body

Taking a contrast color make some little X's around the bottom of the legs near the feet, around the wrists of the arms, and around the top of the head. Stitch a cute little mouth, and if you can find them use some really large buttons for the eyes. If you cant find large enough buttons you can always cut out circles of felt and use that!

Remember this is the pattern for the large doll. The pattern for the normal size doll can be found by clicking the link above!

Tuesday, June 5, 2012

Winter Project #1

Introducing the Harley Quinn Beanie!!!!

I got really bored and needed a break from some of my Harry Potter stuff, so I decided to take on a winter project. It is getting quite chilly down here in Aus afterall!

I decided to make a beanie for myself after my favorite character from Batman, Harley Quinn! 


I'm sure that there are a few patterns out there for this type of hat but I didn't use one this time. So here's my free pattern for it!

Step #1 measure around your head.
Step #2 divide that measurement in half (half of the hat will be red, the other half black)
Step #3 get your materials together.

I used two 50g balls each of Moda Vera Blissful of black and red, and one 50g ball of Moda Vera Blissful white, size 2 straight needles, size 4 straight needles, a yarn needle, and a pompom maker called twinkle bee.
The size of the needles will depend on the yarn you are using, but as a general note I would use one size smaller than the recommended size for the yarn, and then use the size recommended for the yarn.

Now the amount of stitches you cast on will depend on what type of yarn you are using, but just cast on enough so that when you stretch it out on the needles it is equal to the measurement of half your head. We will start with the smaller needles, and cast on your stitches, first with red. Continue in stocking stitch for about 6 rows, be sure to stop on the wrong side to change needles.

Change needles to the larger size and continue knitting for approximately 8 rows in stocking stitch.
After you have gotten this far we will start to decrease our stitches. I use the Knit 3 Knit 2 together method for decreasing my stitches. After each row of decreases continue to knit about 4 rows in stocking stitch before decreasing another row.

Once you have knitted to the desired length and have about 8 stitches remaining cut the yarn leaving a long tail, thread this tail through the remaining stitches and pull tight.

Now do the exact same thing with the Black yarn.

The next step is a bit tricky. You need to measure how far down to sew each arm of the beanie. To do this take one of the colors and place it on the side of your head, and pinch down until you have reached your scalp, remove the yarn from your head and move your fingers up approximately 1 inch. Sew the tail of yarn using the yarn needle to this point on half the beanie. Do the same with the other half.

Now using either color thread or remaining yarn sew both halves of the beanie together.

Now we make the pompoms. We will use the pompom maker from the Twinkle Bee set. If you cant get one of these then that is ok just use something small to wrap your yarn around, but be sure that you can tie some yarn around it before you have to cut it otherwise it will be very difficult!
I wrapped my yarn around this pompom maker exactly 100 times. On the large end of the maker.
Make sure when you tie your yarn around the pompom maker that it is very tight, and that you leave a long tail to use to sew the pompoms to the beanie.

On each of the arms of the beanie at the end you will need to sew the pompom using the yarn needle. I turned mine inside out, but with the yarn I used it was quite messy trying to flip it right side out once I had the pompom secured.

After the pompoms have been sewn on, try the hat on to make sure it fits! And Viola!!! You have your very own Harley Quinn beanie! Of course this doesn't have to be just a Harley Quinn beanie, you can use it as a jesters hat, add your own patterns to the knitting, add more arms, use different colors, whatever you like!


The Long Awaited Robes!!!

(Just a disclaimer: This is not my video this is not me! I do not take credit for this work. I do take credit for the Slytherin robe which I made by following the instructions in this video that I found on Youtube)

So now as promised!!!! Here is the video I used to make my Slytherin Cloak for my Harry Potter night costume. Of course in the video they made a Gryffindor robe, the only difference is that instead of using burgundy I used green material.
In the video they used king size sheets, now I don't know about where you guys come from but here in Australia sheet sets do not come that cheap (especially king size ones!), so to save myself some money I just went out to a local craft shop and got a few meters of material, I used silk because I like the way it drapes and feels when you wear it, but you can really use any sort of material you like. You don't even have to make a Hogwarts Robe out of it, you can literally make any sort of robes you like following the simple instructions on the video!
One other little thing I did differently from the video is that I hand sewed the entire robe, I liked to be able to see my stitches and it really gives it that home made look, but you can use a sewing machine it will be a lot faster AND probably make it look a bit more professional.

The photo to the left is my finished product! You can tell from the video that I used different materials they are pretty shiny in the picture, but thats alright, this is a matter of personal tastes and you can use whatever you like!
Just remember when you are measuring your material you want to add a few inches to each measurement, especially if you are using a sewing machine because the foot will take up some of the length. The length of the whole robe is entirely personal. I made mine just long enough to reach the floor, but if you are short like me then there isn't really much you can do about things being too long. And the arms need to come over your hands, i added about 4 extra inches to my measurements so the robe wouldn't be too short when I raised my arms, and remember that they are supposed to be big, so remember to cut them that way! I cut mine like old witches robes where the sleeves kind of fan out, but I only made it subtle.
There are some little embellishments that I chose to use as well on my cloak. I added the hood just like from the video, but I also added a house patch and a clasp to close the robe.


To the left is the clasp I used. Just a simple rope clasp that I got from Spotlight for pretty cheap. Since I was hand sewing everything I thought it would be a bit easier for me to sew each side of the clasp onto a small square of black felt. That way I could just sew around the square instead of trying to make sure I caught all of the details and this way it also gives the clasp a bit more of a larger area, making sure that it holds tight and wont rip your material as easily, this is a good thing to try and do if you have a really long robe just in case you step on it. To the right is my Slytherin House Crest Patch. This one I bought off ebay for about $4 and just ironed it onto the material, but you could always make your own if you choose, there are a few tutorials on youtube that are good, but I wanted to save some time in finishing it.

So there you have it! The long awaited House Robes Blog is finally up and going places! I hope you enjoyed it!!!

Thursday, May 24, 2012

Never Leave Home without your Companion Cube!

Now, I know that last blog I promised a flashy new blog all on how to make your own hogwarts robes.... but lets face it I lied....

Not entirely though, I do have the robes sitting here in front of me, however after trying them on again they need a bit of tweaking, and I somehow managed to sew the clasp on WAY to high and now it crushes my windpipe when I close it. So this has to be fixed up, and soon, because its nothing but the best for my readers! See how much I love you? No shoddy photos or half attempted projects here!

Now for the last few days I have been sick with some virus flu type monstrosity... which had my sneezing and coughing and running a temperature, and totally NOT feeling up to sewing minute details onto silk, or using too much effort on anything at all, so I decided to keep myself busy while I was in bed, I would make a Portal themed project!

Introducing the Companion Cube from Portal.... in a handy take it anywhere you freaking feel like it size!

This Image here (with the hand) Is what I have made. The Image on the right is my reference which I got from HERE! It was fairly simply to make, required very little materials, and looks pretty darn awesome if I do say so myself!


So I started off with some of those needlepoint squares, the plastic ones.  As you can see in the next photo (also using my hand as a size reference for you all!) I'm not sure of what the proper name for these little babies are so If you know please comment on it for the other viewers! Then I had some pink yarn, light gray yarn, and dark gray yarn, and a black texter. Following the reference I marked out the pattern for each color, on 6 different squares, and started sewing until my heart was content. I used a large yarn needle that I had to pull through the holes, but don't worry these plastic thingies have plenty of give. It doesn't matter how the back of each square looks, it can be messy it can be neat, as long as you tie off your loose ends when you have finished using a color. I left some long tails of the light and dark gray yarn to stitch up the edges so it wouldn't look so lumpy. And be careful how tight you pull your yarn, even though the plastic has some give it can still break and this would be bad!
 Leave one of the edges open when you are stitching up your sides to finish, and you can put anything you like inside it. I just used some craft stuffing, but you can put anything inside it to make it weighted.

ENJOY!!! and believe me the Hogwarts Robe Tutorial is coming soon. I do apologize once again for delaying it, but as I said I was sick and didn't feel like fixing any of my problems just then.

Don't forget to watch my Deviant Art Page, everything that goes up here also goes up there so it would be a good way to keep track of my entrees!